In the last post, we got the player spawning on the server and on the client. In this post, we are going to setup our basic movement system and get authoritative movement working. My plan is to have 1-2 more posts after this that will deal with other players spawning, despawning, and moving in your game and then after that to take what we have and upload it as a starter project that we can build our actual “game” from (complete with login, registration, persistent world state, etc) – right now we are just trying to get the very basics in place so. It is quite possible the code will undergo some refactoring in the near future – any changes made to the code uploaded will be documented.
Here is how movement is (for now) going to work:
We are going to turn the play area on the server into a navmesh and attach a nav mesh agent to our server player prefab along with a script to control that player. On the client, we will use raycasts to return a vector3 mouse position (though we really only care about X and Z since we are not going to be jumping). We will send that to the server as a “PlayerMoveRequest” and on the server every physics tick we will loop through any stored requests that have not been processed, call Move on our nav mesh agent and then send back the position the player should be ending at. On the client, we will get this and use a NavMesh so the player position and rotation match. Later on, we will add a small animation when the player clicks to help deal with lag we will run into later when the server is no longer hosted locally. Lets get to it!
Server: Setup The NavMesh
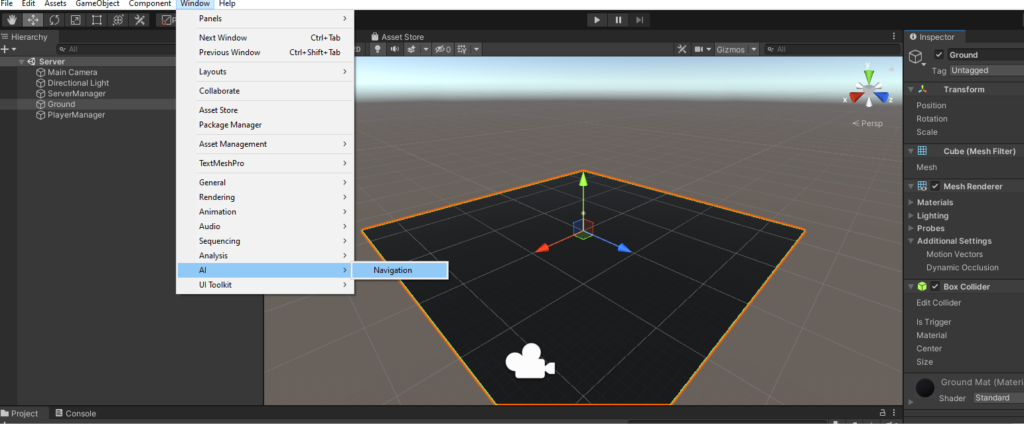
A NavMesh will allow us to setup a walkable zone on geometry that a NavMeshAgent can walk on. Unity provides all sorts of goodies to help make controlling characters (typically AI) easier. You can read more about it HERE and checkout the API docs HERE – for our purposes we only need a very basic setup so click on your Ground and add a NavMesh as shown:
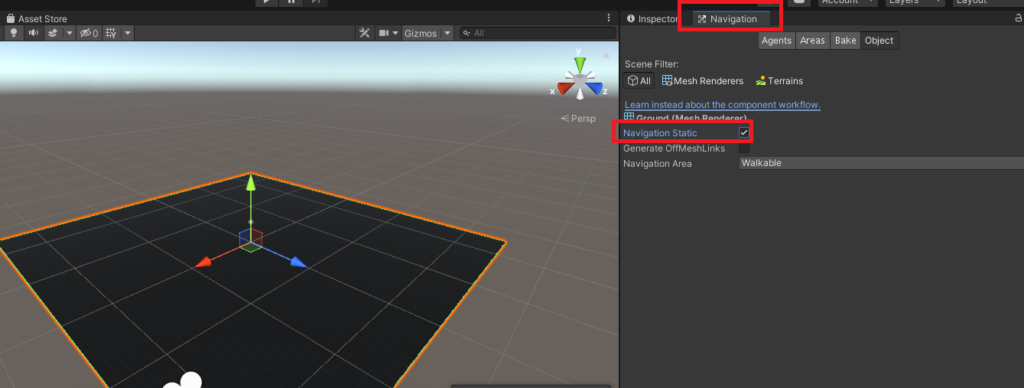
In the tab that opens, check Navigation Static:
move over to the Bake tab at the top and hit “Bake”:
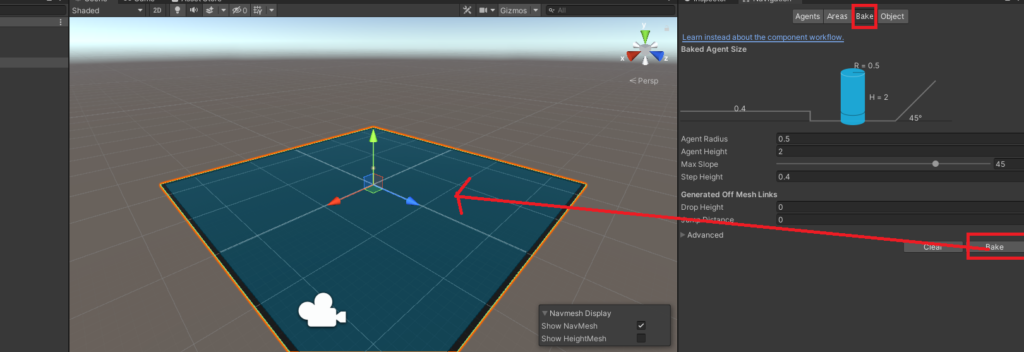
You should see a blue square overlaid on top of the ground as shown. If you do, everything is ready for the next step. If not, check any error messages you might have but this is pretty basic Unity stuff so you shouldn’t hit issues.
Technically we don’t need to mark our navigation as static – this is more for when you have a play area with buildings and other things on it that you want to include in your bake. Also, if you adjust any of the settings in Bake you will need to re-bake. As for the individual settings HERE are the docs, HERE is the official guide – from that link:
- Agent Radius defines how close the agent center can get to a wall or a ledge
- Agent Height defines how low the spaces are that the agent can reach
- Max Slope defines how steep the ramps are that the agent can walk up
- Step Height defines how high obstructions are that the agent can step on/walk over (road->sidewalk for example)
Server: Setup The Server Player Prefab
Under your Prefabs folder select the ServerPlayer prefab. Add the following components as shown:
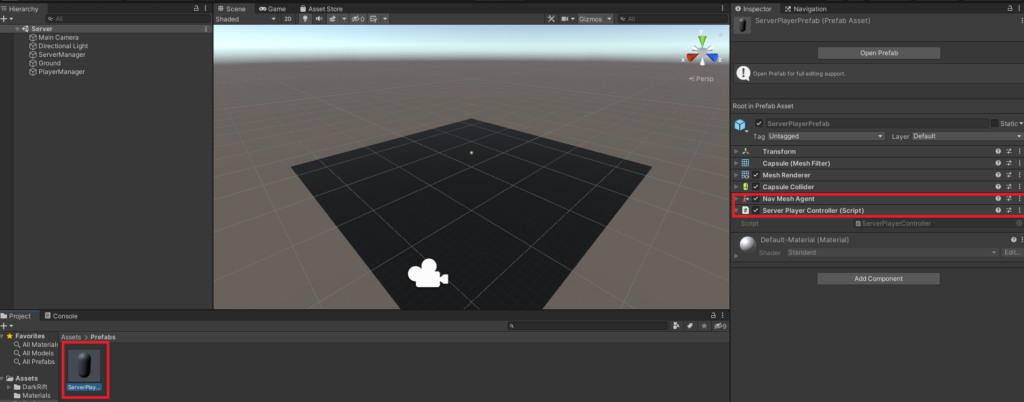
A NavMeshAgent is what will allow us to move the player around the NavMesh. For more info about the NavMeshAgent see THIS – it has a lot of settings and you can write some pretty complicated AI pathing. For a click to move game like this, it is also perfect since we can give each player a NavMeshAgent and let Unity deal with getting our players from a to b.
Next, create and add a script called ServerPlayerController.cs and fill it out as shown:
using UnityEngine;
using UnityEngine.AI;
public class ServerPlayerController : MonoBehaviour
{
    NavMeshAgent agent;

    private void Start()
    {
        agent = GetComponent<NavMeshAgent>();
    }

    public void UpdateNavTarget(Vector3 target)
    {
        agent.SetDestination(target);
    }
}
Aside: Stay organized – move your new script into Scripts. Occasionally it is a good idea to check the top level assets folder to see what might have been added in an unexpected location (unless you create the script first IN Scripts and then attach it).
Client: Player Prefab
We will deal with actually moving the player on the server shortly. For now, switch to the Client and add two scripts to our Player prefab:
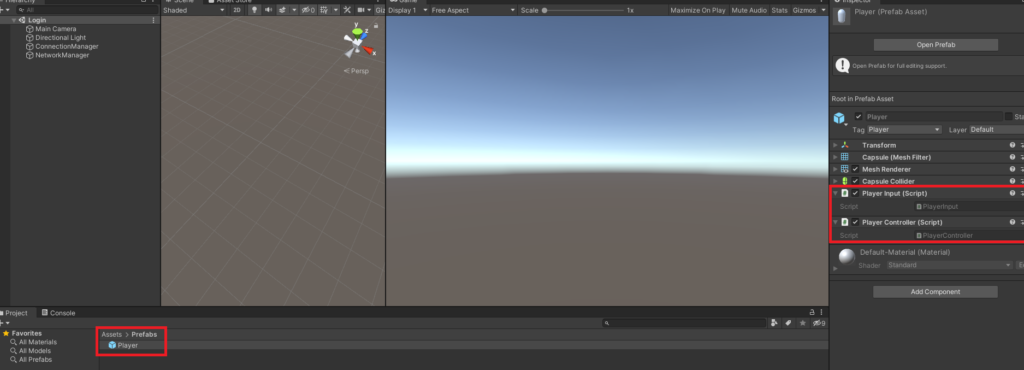
As before, make sure you tidy up by moving your new scripts to Scripts if you have not done that.
Client: Finding Out Where We Clicked
Switch over to the Game scene. First, lets get mouse input working and returning our click position. Open up PlayerInput.cs and add the following:
using System;
using System.Collections;
using System.Collections.Generic;
using UnityEngine;

namespace DarkRiftRPG
{
    public class PlayerInput : MonoBehaviour
    {
        Camera cam;
        private void Start()
        {
            cam = Camera.main;
        }
        private void Update()
        {
            CheckForClick();
        }

        private void CheckForClick()
        {
            if (Input.GetMouseButtonDown(0))
            {
                Ray ray = cam.ScreenPointToRay(Input.mousePosition);
                if (Physics.Raycast(ray, out RaycastHit hit) && hit.transform.CompareTag("Terrain"))
                {
                    Debug.DrawRay(ray.origin, Input.mousePosition, Color.red, 1f);
                    Debug.Log($"Click detected at: {hit.point}");
                }
            }
        }
    }
}
This is all standard Unity stuff but I’ll explain it just in case you have never used a Raycast before. Each frame we are going to check for a click. If we click on the left mouse button on any given frame, we will create an invisible Ray that will start at our camera and and fire into infinity in the direction of the mouse click. You can of course limit the rays length (a common technique used for checking if a player is “grounded” uses this approach). We don’t want to have to get a reference to the main camera each time we click so in Start we cache this ahead of time. If you want to see what is going on here you can add :
Debug.DrawRay(ray.origin, Input.mousePosition, Color.red, 1f);above or below the other Debug.Log – in the Scene view during play you will be able to see the ray when it is fired. You might notice in the code above we are checking the tag of what we hit. We will probably want different things to happen based on what you click on so lets tag our ground as “Terrain” for now:

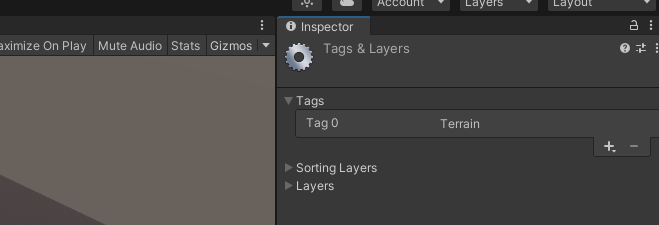
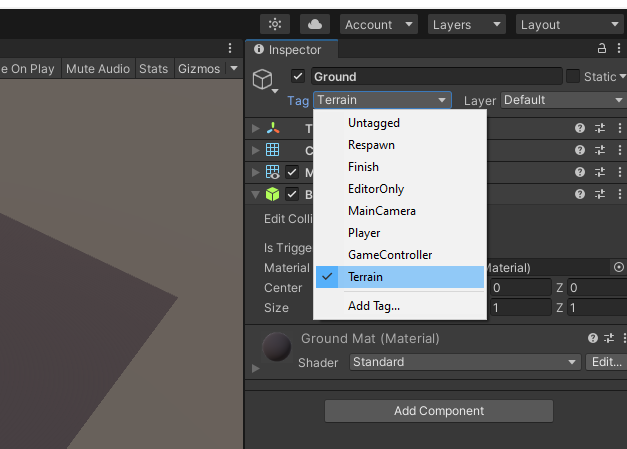
Switch back to the Login scene. Start the server and then the client. When you load the Game scene and spawn in, click around on the ground some. In you console you should see something like:
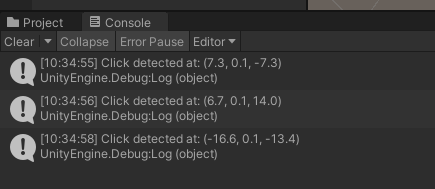
Aside: I realize it is kind of a pain to have to keep switching back and forth between the game and login scenes – you are welcome to create a scene that included the ConnectionManager and the other things we need to load and spawn for testing, but be aware that can also sometimes cause problems. For now I’m just going to swap between them.
Let The Server Know Where We Clicked
We are going to stick with our setup from Pt 4 in terms of how messages flow up to the server:
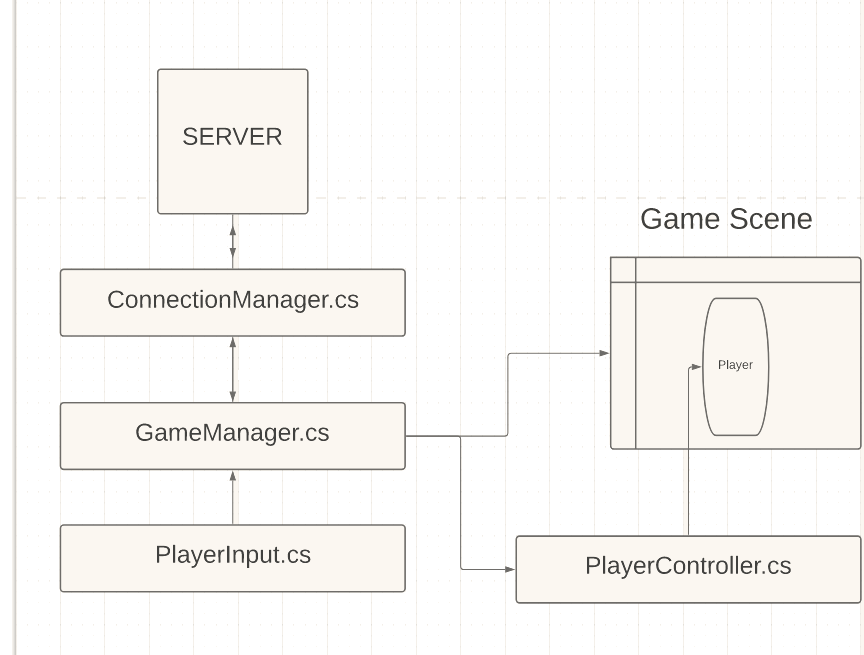
ASIDE: It would be easier to just send the input to the ConnectionManager directly, but I think this will be much easier to debug if we *know* how code will flow. Plus, this way we can intercept it in GameManager and if we want can attach other things to the message. Will we? I don’t know yet. This series of tutorials is basically:

so far. When we get to the point of actually building the game, I will take some time to plan out the general infer structure ahead of time.
Client: Capture And Send Input
Inside PlayerInput.cs we want to capture that Vector3 returned from our ray, package it up nicely in a message, and send that to the server. Before we can send anything we need a message struct and tag to go with it. Open NetworkMessages and add:
PlayerMovementRequestIn your Tags enum. Create a new struct as follows:
public struct PlayerMovementRequestData : IDarkRiftSerializable
{
    public Vector3 PlayerClickLocation;

    public PlayerMovementRequestData(Vector3 clickPos)
    {
        PlayerClickLocation = clickPos;
    }
    public void Deserialize(DeserializeEvent e)
    {
        PlayerClickLocation = e.Reader.ReadVector3();
    }

    public void Serialize(SerializeEvent e)
    {
        e.Writer.WriteVector3(PlayerClickLocation);
    }
}
Remember, to be able to call Read/Write Vector 3 we are going to be using the SerializationExtensions.cs file so if you didn’t grab that in the previous post do that now. You can either download and import the file, or create a new script of that name (minus the .cs) on both the client and server in the shared scripts folder. Then paste in the code, and change the namespace to DarkRiftRPG.
You will also want to wrap NetworkMessages.cs in our DarkRiftRPG namespace. Network messages should look like:
using System.Collections;
using System.Collections.Generic;
using UnityEngine;
using DarkRift;

namespace DarkRiftRPG
{
    public enum Tags
    {
        JoinGameRequest,
        JoinGameResponse,

        SpawnLocalPlayerRequest,
        SpawnLocalPlayerResponse,

        PlayerMovementRequest
    }

    public struct JoinGameResponseData : IDarkRiftSerializable
    {
        public bool JoinGameRequestAccepted;

        public JoinGameResponseData(bool accepted)
        {
            JoinGameRequestAccepted = accepted;
        }
        public void Deserialize(DeserializeEvent e)
        {
            JoinGameRequestAccepted = e.Reader.ReadBoolean();
        }

        public void Serialize(SerializeEvent e)
        {
            e.Writer.Write(JoinGameRequestAccepted);
        }
    }

    public struct SpawnLocalPlayerResponseData : IDarkRiftSerializable
    {
        public ushort ID;

        public SpawnLocalPlayerResponseData(ushort id)
        {
            ID = id;
        }

        public void Deserialize(DeserializeEvent e)
        {
            ID = e.Reader.ReadUInt16();
        }

        public void Serialize(SerializeEvent e)
        {
            e.Writer.Write(ID);
        }
    }

    public struct PlayerMovementRequestData : IDarkRiftSerializable
    {
        public Vector3 PlayerClickLocation;

        public PlayerMovementRequestData(Vector3 clickPos)
        {
            PlayerClickLocation = clickPos;
        }
        public void Deserialize(DeserializeEvent e)
        {
            PlayerClickLocation = e.Reader.ReadVector3();
        }

        public void Serialize(SerializeEvent e)
        {
            e.Writer.WriteVector3(PlayerClickLocation);
        }
    }

}
Coolio. Back in PlayerInput.cs inside our if statement (you can remove the debug.log statements if you want but for now you may want to leave at least the one that confirms where you clicked) add:
GameManager.Instance.SendClickPosToServer(hit.point);
Obviously that method doesn’t exist, so create it inside GameManager.cs.
ASIDE: I keep mentioning hitting control + . to auto create the method and this is a great time to do that:


Once you do, you can hit f12 to navigate to that new method. If you do it this way, by default instead of being public it will be internal. An internal method gives access to code from the same assembly (so in this case, everything) but if you ever wanted it to be called from somewhere else outside your project it would not work. You can read about the different types HERE.
If you did end up with internal, change it to public to keep things consistent for now. We don’t need to do anything to this Vector3 here so lets pass it up the chain. Inside SendClickPosToServer add:
ConnectionManager.Instance.SendClickPosToServer(point)
And as before create the method. Now, move over to ConnectionManager and find your new method (f12 is your friend). Again, make it public and inside add the following:
public void SendClickPosToServer(Vector3 point)
{
    using (Message message = Message.Create((ushort)Tags.PlayerMovementRequest, new PlayerMovementRequestData(point)))
    {
        Client.SendMessage(message, SendMode.Reliable);
    }
}
There really shouldn’t be anything surprising here. We are choosing Reliable as our SendMode because if a player clicks and that packet is lost and they don’t move on the first click it will feel crappy. You can of course use some sort of Reliable UDP setup if you want but that is out of scope for this series. If you are capturing a constant stream of input like a button being held down in an FPS game, if one or two of those messages don’t make it to the server it’s not really a big deal. Here, if you click and don’t move until you click again, it isn’t going to feel good to the player. Over to the Server!
Server: Listening For Clicks
Inside ConnectedClients.cs in OnMessage add a new case:
case Tags.SpawnLocalPlayerRequest:
    OnPlayerMovementRequest(m.Deserialize<PlayerMovementRequestData>());
    break;
If you see something like:
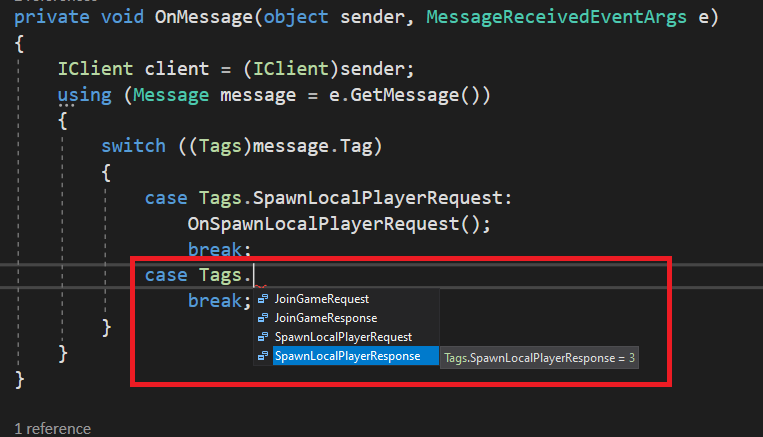
Remember to make sure you copied over the changes from NetworkMessages on the Client.
REFACTOR: Personally, I think the word “message” is too verbose here. “m” will do. This is personal preference and while typically single letter names are bad form in this case I think it is pretty clear what “m” is. See below – this is how OnMessage should currently look (after that edit):
private void OnMessage(object sender, MessageReceivedEventArgs e)
{
    IClient client = (IClient)sender;
    using (Message m = e.GetMessage())
    {
        switch ((Tags)m.Tag)
        {
            case Tags.SpawnLocalPlayerRequest:
                OnSpawnLocalPlayerRequest();
                break;
            case Tags.PlayerMovementRequest:
                OnPlayerMovementRequest(m.Deserialize<PlayerMovementRequestData>());
                break;
        }
    }
}
Create OnPlayerMovementRequest as follows:
private void OnPlayerMovementRequest(PlayerMovementRequestData data)
{
    PlayerManager.Instance.HandlePlayerMovementRequest(ClientID, data.PlayerClickLocation);
}
And, you guessed it, create HandlePlayerMovementRequest inside PlayerManager.cs.
ASIDE: We are calling it Handle instead of On because they are technically different things. This is a personal naming convention that follows the logic that the ConnectedClient *receives* input and the PlayerManager *handles* input. You can name this whatever you want of course.
Handling Clicks
We don’t actually want to update the players position on the server right away. Think about it, if you had 500 players all clicking around and you updated them as soon as a click came in you would then have to update every other client of that movement. This means a lot more packets going out then we want, and it is horribly inefficient. What we are *going* to do is send/receive clicks as quickly as possible, but process all of the new input at the same time and send out ONE update message to clients.
We could add another dictionary that would hold the ClientID and click position for each of the received inputs but cycling through multiple foreach loops matching them with CurrentPlayers sounds like a pain so instead we are going to create a new struct that and have a list of those. This will make sense shortly if it doesn’t right now.
Open up PlayerManager.cs – At the top, above our class but below out namespace add:
struct NewPlayerPositionInput
{
    public ushort ID;
    public Vector3 Pos;
}
Under our CurrentPlayers dictionary add the following:
List<NewPlayerPositionInput> UnprocessedPlayerMovementInput = new List<NewPlayerPositionInput>();
Then, inside our new HandlePlayerMovementRequest method add:
public void HandlePlayerMovementRequest(ushort clientID, Vector3 playerClickLocation)
{
    NewPlayerPositionInput input = new NewPlayerPositionInput(clientID, playerClickLocation);
    UnprocessedPlayerMovementInput.Add(input);
}
PlayerManager should now look like:
PlayerManager.cs
using System;
using System.Collections.Generic;
using UnityEngine;
using DarkRift;

namespace DarkRiftRPG
{
    struct NewPlayerPositionInput
    {
        public ushort ID;
        public Vector3 Pos;

        public NewPlayerPositionInput(ushort id, Vector3 pos)
        {
            ID = id;
            Pos = pos;
        }
    }

    public class PlayerManager : MonoBehaviour
    {
        public static PlayerManager Instance;
        public GameObject ServerPlayerPrefab;

        Dictionary<ushort, GameObject> CurrentPlayers = new Dictionary<ushort, GameObject>();

        List<NewPlayerPositionInput> UnprocessedPlayerMovementInput = new List<NewPlayerPositionInput>();

        void Awake()
        {
            if (Instance != null)
            {
                Destroy(gameObject);
                return;
            }
            Instance = this;
        }

        public void SpawnPlayerOnServer(ushort clientID)
        {
            if (!CurrentPlayers.ContainsKey(clientID))
            {
                GameObject go = Instantiate(ServerPlayerPrefab, ServerPlayerPrefab.transform.position, Quaternion.identity);
                CurrentPlayers.Add(clientID, go);
                ServerManager.Instance.ConnectedClients[clientID].SpawnLocalPlayerOnClient();
            }
        }

        public void HandlePlayerMovementRequest(ushort clientID, Vector3 playerClickLocation)
        {
            NewPlayerPositionInput input = new NewPlayerPositionInput(clientID, playerClickLocation);
            UnprocessedPlayerMovementInput.Add(input);
        }
    }
}
Quick Recap:
Recap:
- We create a struct to hold the ID belonging to the player who clicks along with where they clicks.
- We use a list of those structs called UnprocessedPlayerMovementInput as a way to hold all input we have received but not processed
- When we get input in our ClientConnection, it gets forwarded to HandlePlayerMovementRequest inside PlayerManager.cs – inside we create a new instance of our struct from about and fill out the details before storing it in our list.
ASIDE: We could work around this issue of needing to tie the ID of the client with the input if we send the players ID with the message from the client, but since the server knows what client the input is coming from, to me it makes sense to have the server handle adding extra information we need. Adding an ID field to our PlayerMovementRequestData means we would need to fill that out on the client. You can approach this either way, if a different way to store the data makes sense to you – have at it.
Handling Clicks Pt 2
Ok, so now we will store player clicks as they come in into our UnprocessedPlayerMovementInput list. Inside FixedUpdate, we are going to loop through all of the unprocessed click info, and using CurrentPlayers tell which player to move where. When we finish with that, we are going to store all of the most recent player positions and send that back to the client (and later all clients) so we can move the player locally. Inside PlayerManager.cs add the following below HandlePlayerMovementRequest:
private void FixedUpdate()
{
    foreach (PlayerPositionInputData input in UnprocessedPlayerMovementInput)
            {
                ServerPlayerController controller = CurrentPlayers[input.ID].GetComponent<ServerPlayerController>();

                controller.UpdateNavTarget(input.Pos);

                ProccessedPlayerMovementInput.Add(input);
            }

    UnprocessedPlayerMovementInput.Clear();
}
First, we loop through all of our unprocessed player movement. For each unprocessed input, we get a reference to the ServerPlayerController for that server player and use the input information to update the nav mesh agent’s target.
After we finish updating all the players, we want to clear out our UnprocessedPlayerMovementInput to keep it’s size down (in theory this could get large very quickly and down the road we may need to refactor this to be more performant but for now it is fine).
If you run the project now and left click around on the click, you should see the server player for that client moving. If the orientation seems off (You click top left and it move right and down) make sure your scenes are oriented the same in the inspector. Of course, the player is only moving on the server at the moment. Lets fix that. Up at the top of PlayerManager, add a new list under UnprocessedPlayerMovementInput:
List<PlayerPositionInput> ProccessedPlayerMovementInput = new List<PlayerPositionInput>();Rename the NewPlayerPositionInput struct to PlayerPositionInput and update the UnprocessedPlayerMovementInput list to use this as well. This refactor is to reduce our code footprint (even though just a little) and to make it more clear what this is. New/Old/Processed/Unprocessed will be determined by the name we give our list.
Inside our foreach add:
ProccessedPlayerMovementInput.Add(input);
So, now we loop through the input we are waiting to process, process it, and add it to a new list that we will send back to the client. Also, we want to clear the list of proccessed movement for the same reason:
ProccessedPlayerMovementInput.Clear();Before we can actually send this information we need to do a couple of things:
- We need to make PlayerPositionInput into something DR can work with. Cut PlayerPositionUpdate out of PlayerManager and add it to our NetworkMessages at the end with some changes as shown:
public struct PlayerPositionInputData : IDarkRiftSerializable
{
    public ushort ID;
    public Vector3 Pos;

    public PlayerPositionInputData(ushort id, Vector3 pos)
    {
        ID = id;
        Pos = pos;
    }

    public void Deserialize(DeserializeEvent e)
    {
        ID = e.Reader.ReadUInt16();
        Pos = e.Reader.ReadVector3();
    }

    public void Serialize(SerializeEvent e)
    {
        e.Writer.Write(ID);
        e.Writer.WriteVector3(Pos);
    }
}
I am changing the name to include the word Data to keep things consistent, but otherwise we are just writing code to let DR send/receive this.
2. We don’t want to send each update to each player as it’s own message as that is not very efficient so we need a way to send the entire list of new updates at one time:
public struct ProccessedPlayerMovementData : IDarkRiftSerializable
{
    public PlayerPositionInputData[] ProccessedMovementUpdate;

    public ProccessedPlayerMovementData(PlayerPositionInputData[] newPlayerPositions)
    {
        ProccessedMovementUpdate = newPlayerPositions;
    }
    public void Deserialize(DeserializeEvent e)
    {
        ProccessedMovementUpdate = e.Reader.ReadSerializables<PlayerPositionInputData>();
    }

    public void Serialize(SerializeEvent e)
    {
        e.Writer.Write(ProccessedMovementUpdate);
    }
}
ASIDE: DarkRift is nifty – we can send an array of other structs DR is able to serialize in a single message. You might notice that we are using an array here instead of a list. DR does not support using Lists in this case so we have to use an array and do some converting on our end. We don’t use an array in PlayerManager because an array requires you to know the size ahead of time. We can use it here, because before we send the new position updates to each client we will have a complete list.
3. Back inside PlayerManager in FixedUpdate under our foreach add:
ProccessedPlayerMovementData proccessedMovement = new ProccessedPlayerMovementData(ProccessedPlayerMovementInput.ToArray());This will take our list of updated positions and stick it into the struct we made. Note the ToArray conversion in the constructor. Lastly, we need a way to send this to all clients so under that line add:
ServerManager.Instance.SendToAll(Tags.PlayerMovementUpdate, proccessedMovement);This doesn’t exist yet so move over to ServerManager.cs and at the end add the following:
public void SendToClient(ushort id, Tags t, IDarkRiftSerializable obj, SendMode mode = SendMode.Reliable)
{
    using (Message m = Message.Create<IDarkRiftSerializable>((ushort)t, obj))
    {
        ConnectedClients[id].Client.SendMessage(m, mode);
    }
}

public void SendToAll(Tags t, IDarkRiftSerializable obj, SendMode mode = SendMode.Reliable)
{
    foreach (KeyValuePair<ushort, ConnectedClient> connectedClient in ConnectedClients)
    {
        using (Message m = Message.Create<IDarkRiftSerializable>((ushort)t, obj))
        {
            connectedClient.Value.Client.SendMessage(m, mode);
        }
    }
}

public void SendToAllExcept(ushort id, Tags t, IDarkRiftSerializable obj, SendMode mode = SendMode.Reliable)
{
    using (Message m = Message.Create<IDarkRiftSerializable>((ushort)t, obj))
    {
        foreach (KeyValuePair<ushort, ConnectedClient> connectedClient in ConnectedClients)
        {
            if (connectedClient.Key != id)
            {
                connectedClient.Value.Client.SendMessage(m, mode);
            }
        }
    }
}
These are methods I have written that I re-use in pretty much every DR project I start. If you were creating a game on your own, chances are at some point you would figure out that you would want to have something similar. These help keep our code clean by letting us avoid having to writing code for a new message every time we want to send one. If you call your dictionary of clients something else, just swap that in where you see “ConnectedClients”. Here is a very quick breakdown of each:
SendToClient – Does what it says, you pass in the id of the client you want to message, the tag for the message, and the message itself. By default (for all of these) send mode is set to Reliable but you can override that by explicitly setting it in the constructor.
SendToAll – Same as SendToClient, but sends to all connected clients stored on the server
SendToAllExcept – Useful when we want to update every *other* player about something a client did, but we don’t need that client to get the message.
That was a lot to take in. Lets make sure our files look correct and then move to the client to handle these updates:
PlayerManager.cs
using System;
using System.Collections.Generic;
using UnityEngine;
using DarkRift;

namespace DarkRiftRPG
{
    public class PlayerManager : MonoBehaviour
    {
        public static PlayerManager Instance;

        public GameObject ServerPlayerPrefab;

        Dictionary<ushort, GameObject> CurrentPlayers = new Dictionary<ushort, GameObject>();
        List<PlayerPositionInputData> UnprocessedPlayerMovementInput = new List<PlayerPositionInputData>();
        List<PlayerPositionInputData> ProccessedPlayerMovementInput = new List<PlayerPositionInputData>();

        void Awake()
        {
            if (Instance != null)
            {
                Destroy(gameObject);
                return;
            }
            Instance = this;
        }

        public void SpawnPlayerOnServer(ushort clientID)
        {
            if (!CurrentPlayers.ContainsKey(clientID))
            {
                GameObject go = Instantiate(ServerPlayerPrefab, ServerPlayerPrefab.transform.position, Quaternion.identity);
                CurrentPlayers.Add(clientID, go);
                ServerManager.Instance.ConnectedClients[clientID].SpawnLocalPlayerOnClient();
            }
        }

        public void HandlePlayerMovementRequest(ushort clientID, Vector3 playerClickLocation)
        {
            PlayerPositionInputData input = new PlayerPositionInputData(clientID, playerClickLocation);
            UnprocessedPlayerMovementInput.Add(input);
        }

        private void FixedUpdate()
        {
            foreach (PlayerPositionInputData input in UnprocessedPlayerMovementInput)
            {
                ServerPlayerController controller = CurrentPlayers[input.ID].GetComponent<ServerPlayerController>();
                controller.UpdateNavTarget(input.Pos);
                ProccessedPlayerMovementInput.Add(input);
            }

            ProccessedPlayerMovementData proccessedMovement = new ProccessedPlayerMovementData(ProccessedPlayerMovementInput.ToArray());
            ServerManager.Instance.SendToAll(Tags.PlayerMovementUpdate, proccessedMovement);
            UnprocessedPlayerMovementInput.Clear();
            ProccessedPlayerMovementInput.Clear();

        }
    }
}
NetworkMessages.cs
using System.Collections;
using System.Collections.Generic;
using UnityEngine;
using DarkRift;

namespace DarkRiftRPG
{
    public enum Tags
    {
        JoinGameRequest,
        JoinGameResponse,

        SpawnLocalPlayerRequest,
        SpawnLocalPlayerResponse,

        PlayerMovementRequest,
        PlayerMovementUpdate
    }

    public struct JoinGameResponseData : IDarkRiftSerializable
    {
        public bool JoinGameRequestAccepted;

        public JoinGameResponseData(bool accepted)
        {
            JoinGameRequestAccepted = accepted;
        }
        public void Deserialize(DeserializeEvent e)
        {
            JoinGameRequestAccepted = e.Reader.ReadBoolean();
        }

        public void Serialize(SerializeEvent e)
        {
            e.Writer.Write(JoinGameRequestAccepted);
        }
    }

    public struct SpawnLocalPlayerResponseData : IDarkRiftSerializable
    {
        public ushort ID;

        public SpawnLocalPlayerResponseData(ushort id)
        {
            ID = id;
        }

        public void Deserialize(DeserializeEvent e)
        {
            ID = e.Reader.ReadUInt16();
        }

        public void Serialize(SerializeEvent e)
        {
            e.Writer.Write(ID);
        }
    }

    public struct PlayerMovementRequestData : IDarkRiftSerializable
    {
        public Vector3 PlayerClickLocation;

        public PlayerMovementRequestData(Vector3 clickPos)
        {
            PlayerClickLocation = clickPos;
        }
        public void Deserialize(DeserializeEvent e)
        {
            PlayerClickLocation = e.Reader.ReadVector3();
        }

        public void Serialize(SerializeEvent e)
        {
            e.Writer.WriteVector3(PlayerClickLocation);
        }
    }

    public struct PlayerPositionInputData : IDarkRiftSerializable
    {
        public ushort ID;
        public Vector3 Pos;

        public PlayerPositionInputData(ushort id, Vector3 pos)
        {
            ID = id;
            Pos = pos;
        }

        public void Deserialize(DeserializeEvent e)
        {
            ID = e.Reader.ReadUInt16();
            Pos = e.Reader.ReadVector3();
        }

        public void Serialize(SerializeEvent e)
        {
            e.Writer.Write(ID);
            e.Writer.WriteVector3(Pos);
        }
    }

    public struct ProccessedPlayerMovementData : IDarkRiftSerializable
    {
        public PlayerPositionInputData[] ProccessedMovementUpdate;

        public ProccessedPlayerMovementData(PlayerPositionInputData[] newPlayerPositions)
        {
            ProccessedMovementUpdate = newPlayerPositions;
        }
        public void Deserialize(DeserializeEvent e)
        {
            ProccessedMovementUpdate = e.Reader.ReadSerializables<PlayerPositionInputData>();
        }

        public void Serialize(SerializeEvent e)
        {
            e.Writer.Write(ProccessedMovementUpdate);
        }
    }

}
ServerManager.cs
using System;
using System.Collections.Generic;
using DarkRift;
using DarkRift.Server;
using DarkRift.Server.Unity;
using UnityEngine;

namespace DarkRiftRPG
{
    public class ServerManager : MonoBehaviour
    {
        public static ServerManager Instance;

        public Dictionary<ushort, ConnectedClient> ConnectedClients = new Dictionary<ushort, ConnectedClient>();

        private XmlUnityServer xmlServer;
        private DarkRiftServer server;
        void Awake()
        {
            if (Instance != null)
            {
                Destroy(gameObject);
                return;
            }
            Instance = this;
            DontDestroyOnLoad(this);
        }
        void Start()
        {
            xmlServer = GetComponent<XmlUnityServer>();
            server = xmlServer.Server;
            server.ClientManager.ClientConnected += OnClientConnected;
            server.ClientManager.ClientDisconnected += OnClientDisconnected;
        }

        void OnDestroy()
        {
            server.ClientManager.ClientConnected -= OnClientConnected;
            server.ClientManager.ClientDisconnected -= OnClientDisconnected;
        }

        private void OnClientDisconnected(object sender, ClientDisconnectedEventArgs e)
        {
            e.Client.MessageReceived -= OnMessage;
        }

        private void OnClientConnected(object sender, ClientConnectedEventArgs e)
        {
            e.Client.MessageReceived += OnMessage;
        }

        private void OnMessage(object sender, MessageReceivedEventArgs e)
        {
            IClient client = (IClient)sender;
            using (Message message = e.GetMessage())
            {
                switch ((Tags)message.Tag)
                {
                    case Tags.JoinGameRequest:
                        OnPlayerJoinGameRequest(client);
                        break;
                }
            }
        }

        private void OnPlayerJoinGameRequest(IClient client)
        {
            JoinGameResponseData data = new JoinGameResponseData();
            if (ConnectedClients.ContainsKey(client.ID))
            {
                data.JoinGameRequestAccepted = false;

                using (Message message = Message.Create((ushort)Tags.JoinGameResponse, data))
                {
                    client.SendMessage(message, SendMode.Reliable);
                }
                return;
            } else
            {
                data.JoinGameRequestAccepted = true;

                client.MessageReceived -= OnMessage;

                ConnectedClient c = new ConnectedClient(client);
                ConnectedClients.Add(c.ClientID, c);

                using (Message message = Message.Create((ushort)Tags.JoinGameResponse, data))
                {
                    client.SendMessage(message, SendMode.Reliable);
                }
            }
        }

        public void SendToClient(ushort id, Tags t, IDarkRiftSerializable obj, SendMode mode = SendMode.Reliable)
        {
            using (Message m = Message.Create<IDarkRiftSerializable>((ushort)t, obj))
            {
                ConnectedClients[id].Client.SendMessage(m, mode);
            }
        }

        public void SendToAll(Tags t, IDarkRiftSerializable obj, SendMode mode = SendMode.Reliable)
        {
            foreach (KeyValuePair<ushort, ConnectedClient> connectedClient in ConnectedClients)
            {
                using (Message m = Message.Create<IDarkRiftSerializable>((ushort)t, obj))
                {
                    connectedClient.Value.Client.SendMessage(m, mode);
                }
            }
        }

        public void SendToAllExcept(ushort id, Tags t, IDarkRiftSerializable obj, SendMode mode = SendMode.Reliable)
        {
            using (Message m = Message.Create<IDarkRiftSerializable>((ushort)t, obj))
            {
                foreach (KeyValuePair<ushort, ConnectedClient> connectedClient in ConnectedClients)
                {
                    if (connectedClient.Key != id)
                    {
                        connectedClient.Value.Client.SendMessage(m, mode);
                    }
                }
            }
        }
    }
}
And of course, don’t forget to make sure the changes in your NetworkMessages make it to the matching file in the other project.
Handling Movement Clientside
Now that we have clicks coming in and Vector3s going out, we need to deal with moving the local player. In the future this will work for all connected players but lets just get one working at the moment. Originally, I had created a system that used Vector3.MoveTowards to move the player when the “confirmed” position came back from the server but this had two issues:
- I ran into some oddness with the player falling below the world on the client despite my best efforts and the fix I came up with lead me to think “there is a better way…”
- While it is true the positions ended up being the same, Vector3.MoveTowards does not account for rotation and the NavMeshAgent does. You could get around this by also sending back the server side rotation but I find that “It works if you do some hacky fix” means that you should probably go back and rethink things.
So, lets setup the client with everything it needs to mirror the server side position/rotation and make sure things are consistent. This also adds another sanity check since if the NavMesh is the same and we will only send clicks if we click on the ground, there is an initial client side check to see if the requested movement *could* even be valid.
Open up the Player prefab and make sure you created and attached the PlayerController.cs script to it. Next, add a NavMeshAgent and make sure the settings are the same as the one for the player on the server:
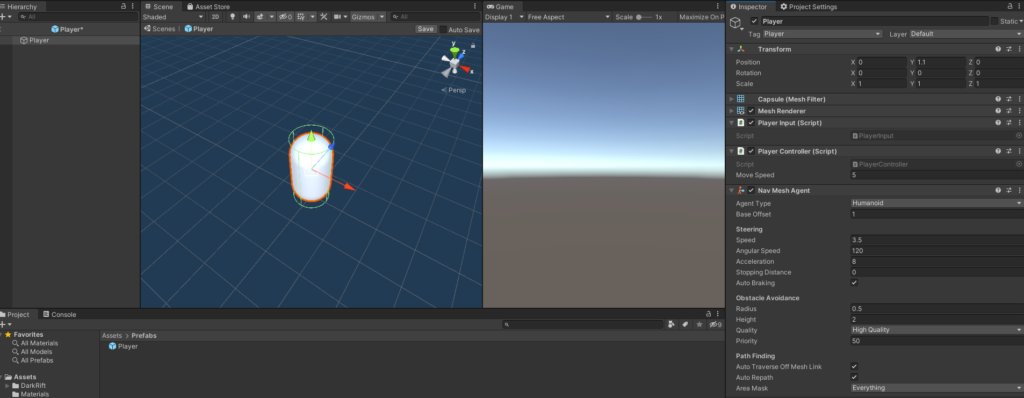
Fantastic! Move over to the Game scene if you are not already there and like with the server add a NavMesh:
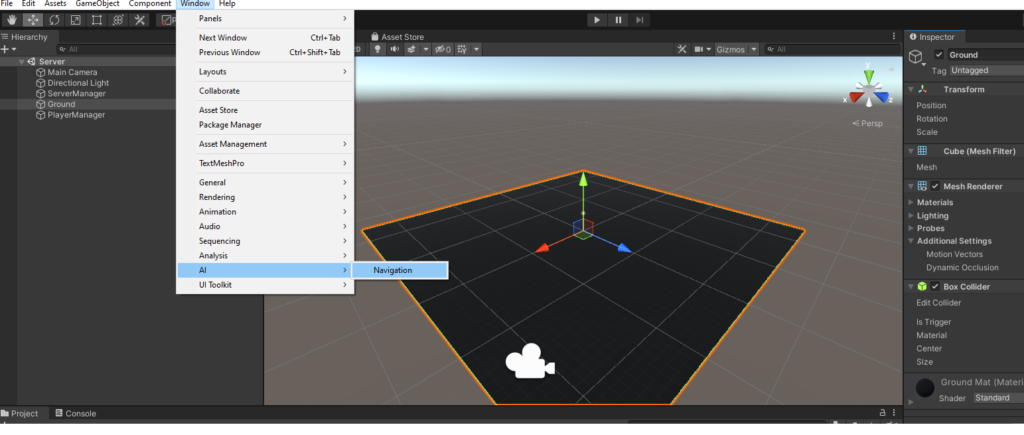
Make sure navigation is marked as static and then move over to the Bake tab and.. Bake it. Screenshots near the top of this article have more detail if you are having trouble here.
Ok – Lets listen for and deal with movement updates. Open up ConnectionManager.cs and on OnMessage add a new case:
case Tags.PlayerMovementUpdate:
    OnPlayerMovementUpdate(m.Deserialize<ProccessedPlayerMovementData>());
    break;
Then create OnPlayerMovementUpdate:
private void OnPlayerMovementUpdate(ProccessedPlayerMovementData data)
{
    if (GameManager.Instance != null)
        GameManager.Instance.HandlePlayerMovementUpdate(data);
}
We need to check to make sure that the player is in the Game scene before we try to move it or another player or we will get an error. We now need to implement HandlePlayerMovementUpdate() so create that method in GameManager:
public void HandlePlayerMovementUpdate(ProccessedPlayerMovementData data)
{
    List<PlayerPositionInputData> playerPositions = data.ProccessedMovementUpdate.ToList();
    foreach (PlayerPositionInputData pos in playerPositions)
    {
        if (ConnectedPlayers.ContainsKey(pos.ID))
        {
            PlayerController controller = ConnectedPlayers[pos.ID].GetComponent<PlayerController>();
            controller.SetNewDest(pos.Pos);
        }
    }
}
We take in the ProccessedPlayerMovementData and then create a list of position updates like we did on the server, only this time we are using ToList instead of ToArray. You will need to include “using system.Linq;” at the top for .ToList() to work. We then loop through each update, check to make sure the player for that update exists on the client, and then using the PlayerController for that player set a new destination. PlayerController has been created but doesn’t have anything in it at the moment. Lets change that:
using System;
using System.Collections;
using System.Collections.Generic;
using UnityEngine;
using UnityEngine.AI;
public class PlayerController : MonoBehaviour
{
    NavMeshAgent agent;
    private void Start()
    {
        agent = GetComponent<NavMeshAgent>();
    }

    public void SetNewDest(Vector3 target)
    {
        agent.SetDestination(target);
    }
}
This is a pretty simple script. We call SetNewDest from GameManager and do just that. It looks almost the same on the server – the method name is different because on the server (conceptually) we are updating it and on the client we are telling it (setting). If you want to be more consistent, pick one and have them both use that name.
ASIDE: if you want to see the original approach had planned for this, take a look at THIS. It works, but is already more complicated then it needs to be. When refactoring, I always ask myself “Is there a more direct way to do this that still achieves everything I need it to do” – often the answer is “yes”.
ASIDE: In a “real” game you would get values from the server for things like speed, health, or values for the NavMeshAgest. For now it doesn’t matter. If you want to challenge yourself, feel free to have the NavMeshAgent values for the player on the server sent to the client when they spawn into the game scene.
Alright, if you start it up after the client spawn you should be able to click and see the player moving on both the client and the server. If it looks like the player is moving in a different direction on either the client or server make sure your orientations match:

You can build the project and test with multiple clients. Each client will only see itself right now, but the server should see all of them. In the next post we will get other players spawning/despawning and sync everyone’s movement. See you there!

Hi Gabriel – it appears I somehow neglected to actually add the player in the tutorial – I checked my repo for this code (https://github.com/MrBabadook/DarkRiftRPGClient/blob/main/Assets/Scripts/GameManager.cs) and I do see it there so I am going to chalk this up to being an “oopsie” on my part. Glad you got it working – you did it correctly 🙂