
In Part 3 of this series we covered the code and setup needed for the client to connect to the server, ask to join, and then change scenes when successful. Originally this post was going to cover movement as well but it got a tad long so I am splitting that into Part 5.
When we change scenes, we want to spawn the player. On the Client, switch over to the Game scene. You might want to adjust your camera for a better view. Here are roughly the value’s I am using at this point if you want it to look the same:

Right click in the hierarchy and create a new empty game object. Name it GameManager. Create and attach a script with the same name.
ASIDE: I think its worth taking a moment to talk about how information is going to flow in our game and also mention a small disclaimer. In a “real” game you would probably have a few steps not seen here but my focus in this series is to get you up and running with as much functionality as simply as possible.
ASIDE: This code, while not “bad” is not taking a whole lot of things that are going to be specific from your own projects into consideration. I will do my best to make this as easy as possible to build on, but YMMV. Also, networking is wonky. Sometimes you are gonna hit bugs that will make you want to tear the flesh from your face. Breathe. If you get stuck while exploring this side of game dev, walk away and come back later. Slamming your face into it only has so much merit. I will have an entire post about approaching debugging.
Basic Client Architecture
For this project, the flow of data on the client is going to look like:
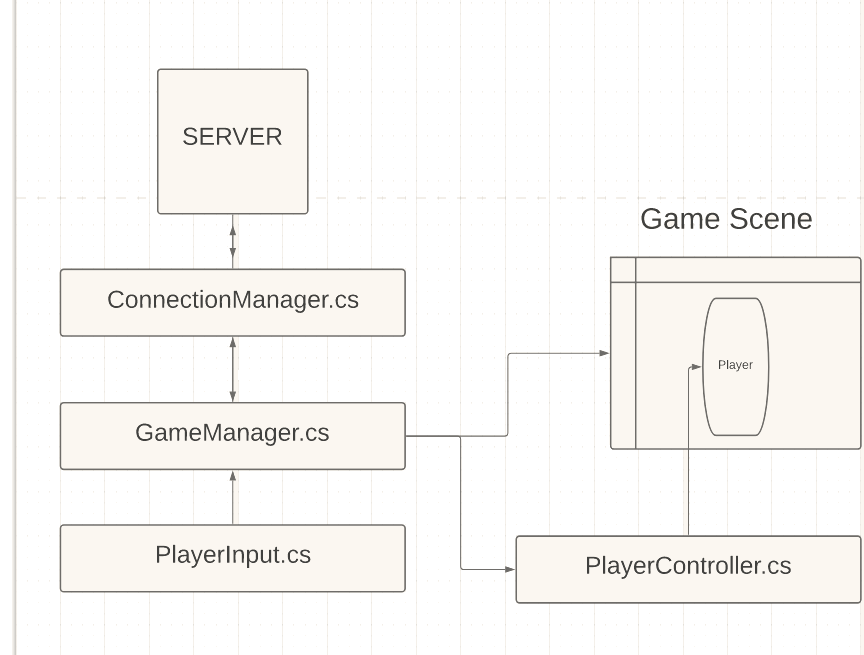
We will have a player in the scene who we will mark as its own owner for each client that is playing. Lets break down what each piece is going to be responsible for.
PlayerController.cs is going to handle moving the player in game, having fields for values like run speed and turning and such. Things like taking damage and dealing with interactions and such will be handled later on.
PlayerInput.cs is going capture mouse clicks as a Vector2 and in the future handle other server bound inputs from the player. This will be attached to the player since it has to live on something and that makes the most sense I think.
GameManager.cs is going to be our main workhorse for now. This will take care of spawning, despawning, storing player, moving players, passing messages up to the ConnectionManager and down to other scripts and such that need them (like the player controller). We may split this into smaller chunks later as the need arises.
ConnectionManager.cs is the point of entry for networking messages in our game. Messages from the server land here and messages from the game manager will stop here before departure.
We will need to grab THIS extension code – it’s not scary I promise. DarkRift out of the box supports sending normal datatypes without problem: Shorts, Bools, Ints, Strings, Arrays, etc. However things like Vector2/3 and Quaternion come from Unity. This extension will add support for the following:
- Reading/Writing Vector2 and Vector3
- Reading/Writing Quaternions
- Support for compressed Quaternions (I have never touched this).
- Reading bools as bytes
- Reading/Writing angles
- Reading bits from bytes (I have never touched this)
You don’t *technically* need this file, but if you don’t your life will be harder then it needs to be… read through the code if you don’t believe me. He wrote it so you don’t have to. Just make a new file under Scripts->Shared called SerializationExtensions.cs and copy the code in (or download the file and import it) – this is MIT licensed and free to use. The DarkRift community is full of great people, join the discord if you get stuck or have questions. There is a wealth of knowledge to be had there.
Next, lets talk about the “handshake” – there are like a million ways to approach this (well not really but certainly a lot) – right now to keep things easy its going to work like this (assuming the server is started):
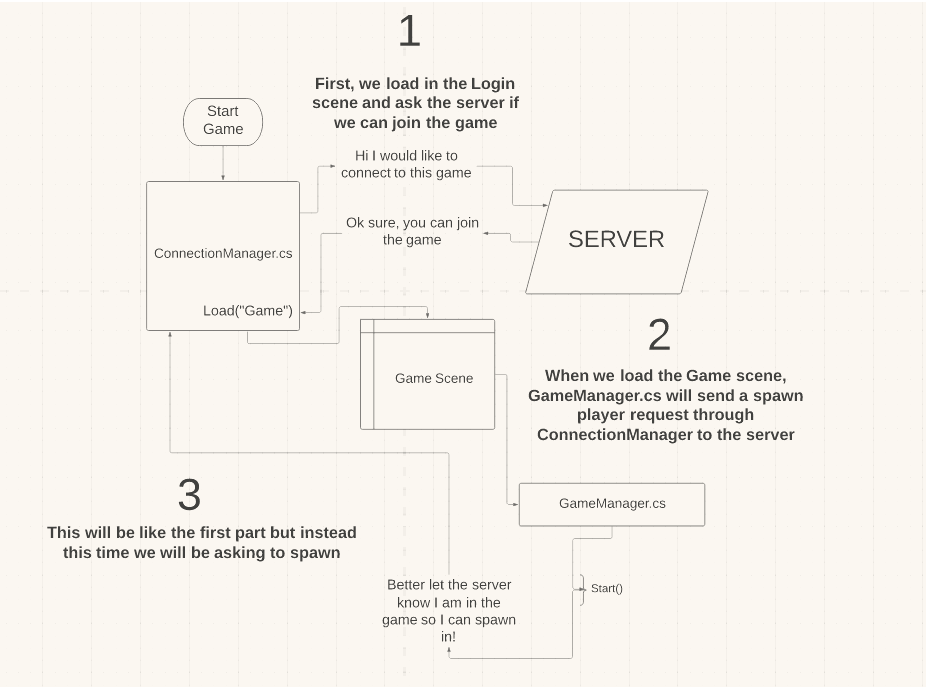
First, we start the game and ask the server if we can connect. If the server says yes, the client will load into the game scene. When the game scene starts, code in GameManager.cs will alert the server (passing it upstream through ConnectionManager) that it is ready to spawn in the player.
The server will get the request to spawn and check to see if that client is connected and that it is in its dictionary of connected clients. If all is good, we will spawn a player game object server side before sending a message telling to client to spawn itself – We want to make sure the server has a matching player on its end before we spawn the player locally so we avoid accidently sending input to an object that doesn’t exist. Like I said this is very similar to the first diagram with the only difference being what is passed.. Lets make it happen.
Setup The Game Manager
Open up GameManager.cs – lets start clean so lets remove everything we don’t need (until we do) and add our required using statements:
using System.Collections;
using System.Collections.Generic;
using UnityEngine;
using DarkRift;
using DarkRift.Client;

namespace DarkRiftRPG
{
    public class GameManager : MonoBehaviour
    {

    }
}
Add the following:
public GameObject playerPrefab;
public Dictionary<ushort, GameObject> ConnectedPlayers = new Dictionary<ushort, GameObject>();
public ushort LocalPlayerID;
We need a reference to the player prefab, a dictionary to hold players on the client, and a reference to the local players ID for our own convenience (otherwise we would have to call ConnectionManager.Instance.LocalClientID every time we wanted this) – I make the distinction between LocalClientID and LocalPlayerID to help us mentally separate the ConnectionManager, which is concerned about the Client itself, and the GameManager which is concerned about players and other world entities . You could call it the same thing in both places but that can get confusing I find.
Next, add:
private void Start()
{
    LocalPlayerID = ConnectionManager.Instance.LocalClientID;
    Debug.Log("Local Player ID set to: " + LocalPlayerID);

    ConnectionManager.Instance.SpawnPlayerOnServerRequest();
}
GameManager.cs should now look like:
using System.Collections;
using System.Collections.Generic;
using UnityEngine;
using DarkRift;
using DarkRift.Client;

namespace DarkRiftRPG
{
    public class GameManager : MonoBehaviour
    {
        public GameObject playerPrefab;
        public Dictionary<ushort, GameObject> ConnectedPlayers = new Dictionary<ushort, GameObject>();
        public ushort LocalPlayerID;

        private void Start()
        {
            LocalPlayerID = ConnectionManager.Instance.LocalClientID;
            Debug.Log("Local Player ID set to: " + LocalPlayerID);

            ConnectionManager.Instance.SpawnPlayerOnServerRequest();
        }
    }
}
When the Game scene loads, this will get called. If you are using Visual Studio you can click on that method (which doesn’t exist inside ConnectionManager yet) and hit “control + .” and then hit enter to have it automatically be created for you. Or you can type it by hand. This matches the diagram above for step 3.
Listening Inside ClientConnection
Next, we need to listen for that message from the client and handle it. Open the Server project and inside ConnectedClient.cs add the following inside the constructor:
Client.MessageReceived += OnMessage;We also want to be able to handle cleanup and removal of clients who disconnect so after the constructor add:
public void OnClientDisconnected(object sender, ClientDisconnectedEventArgs e)
{
    e.Client.MessageReceived -= OnMessage;
}
We will call this when a client disconnects inside ServerManager.cs later. Lastly, we need an OnMessage method to handle communication from this client, so either before or after OnClientDisconnected add:
private void OnMessage(object sender, MessageReceivedEventArgs e)
{
    IClient client = (IClient)sender;
    using (Message message = e.GetMessage())
    {
        switch ((Tags)message.Tag)
        {
        }
    }
}
You are probably thinking “hmm.. I see this a lot” – and you will. Any place in your code you want to be able to have a script/class respond to messages from a client we will need this, as well as the
Client.MessageReceived += OnMessage;
and
Client.MessageReceived -= OnMessage;
bits.
Originally, our ServerManager took care of listening for connections/messages from clients, by letting each instance of ConnectedClient handle this we can keep our code clean and have a logical place for this code to run. Each ConnectedClient represents a player with an active connection, so we listen for that player inside that instance. If that doesn’t make sense, it probably will by the end of this series.
At any rate, your ConnectedClient.cs file should now look like (You will need to add using DarkRift at the top for messages to work):
using System.Collections;
using System.Collections.Generic;
using System;
using DarkRift.Server;
using DarkRift;

namespace DarkRiftRPG
{
    public class ConnectedClient
    {
        public ushort ClientID;
        public IClient Client;
        public ConnectedClient(IClient client)
        {
            Client = client;
            ClientID = client.ID;

            Client.MessageReceived += OnMessage;
        }

        private void OnMessage(object sender, MessageReceivedEventArgs e)
        {
            IClient client = (IClient)sender;
            using (Message message = e.GetMessage())
            {
                switch ((Tags)message.Tag)
                {

                }
            }
        }

        public void OnClientDisconnected(object sender, ClientDisconnectedEventArgs e)
        {
            e.Client.MessageReceived -= OnMessage;
        }
    }
}
Great – now we need to listen for and respond to the client alerting the server that they are in game and ready to spawn.
Update Our NetworkMessages
We already have a SpawnPlayerRequest and SpawnPlayerResponse in our Tags, but we need a SpawnPlayerResponseData packet to send back. Inside NetworkMessages add:
public struct SpawnLocalPlayerResponseData : IDarkRiftSerializable
{
    public ushort ID;

    public SpawnLocalPlayerResponseData(ushort id)
    {
        ID = id;
    }

    public void Deserialize(DeserializeEvent e)
    {
        ID = e.Reader.ReadUInt16();
    }

    public void Serialize(SerializeEvent e)
    {
        e.Writer.Write(ID);
    }
}
You might notice I added the word Local as part of the naming – Later we will want to have a SpawnPlayer data packet used for spawning other players in your game, and we will want to send their position along with them. However, since we are no where close to implementing persistent world state yet, all players who start the game will begin at the middle of the map. At the top in Tags add
SpawnLocalPlayerRequest,
SpawnLocalPlayerResponse
Network Messages should now look like:
using System.Collections;
using System.Collections.Generic;
using UnityEngine;
using DarkRift;

public enum Tags
{
    JoinGameRequest,
    JoinGameResponse,
    SpawnLocalPlayerRequest,
    SpawnLocalPlayerResponse
}

public struct JoinGameResponseData : IDarkRiftSerializable
{
    public bool SpawnPlayerRequestAccepted;

    public JoinGameResponseData(bool accepted)
    {
        SpawnPlayerRequestAccepted = accepted;
    }
    public void Deserialize(DeserializeEvent e)
    {
        SpawnPlayerRequestAccepted = e.Reader.ReadBoolean();
    }

    public void Serialize(SerializeEvent e)
    {
        e.Writer.Write(SpawnPlayerRequestAccepted);
    }
}

public struct SpawnLocalPlayerResponseData : IDarkRiftSerializable
{
    public ushort ID;

    public SpawnLocalPlayerResponseData(ushort id)
    {
        ID = id;
    }

    public void Deserialize(DeserializeEvent e)
    {
        ID = e.Reader.ReadUInt16();
    }

    public void Serialize(SerializeEvent e)
    {
        e.Writer.Write(ID);
    }
}
Make sure you copy this code over to your other project so they match (and save the file, sometimes you will wonder why code isn’t working and it is because the changes have not been saved). In ConnectionManager we will also need to update the Tag inside OnConnectedToServer to match the new one. We will also need to make some minor updates in ServerManager
Setup Server Scene
Ok, now we need to blast through some setup on the server so we can spawn in connected players. We are going to copy our setup for the client game scene. See below:

I added a material to the ground just to be able to see things better. The player is not going to get a material because from the servers point of view every player is just a player, local or otherwise. I also went ahead and created a Materials and a Prefabs folder to keep things tidy. Once you have all that, make your player capsule a prefab and delete it from the scene.
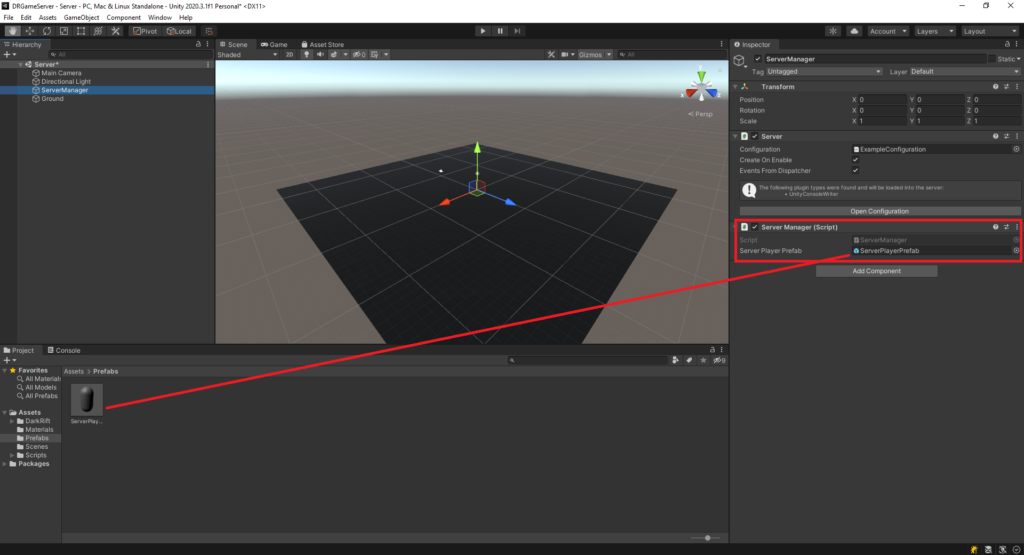
We need a reference to this prefab, so inside ServerManager.cs we will add:
public GameObject ServerPlayerPrefab;up at the top. I put it under the Dictionary and above the XMLUnityServer references. In the inspector drag your player prefab you made into the slot that is now expecting it (I renamed mine to be ServerPlayerPrefab to keep things consistent):
Lets do a quick recap. When we start the client, assuming all goes well, we will ask the server if we can join the game itself. If we can, we will load the game scene and when that happens we will (inside GameManager and passed up through ConnectionManager) call SpawnLocalPlayerRequest which will tell the server to create an instance for that player. If that goes well, we will message the client back and tell them to spawn an instance for themselves locally.
Kicking Off Player Spawning
We have not actually made a request yet on the client to tell the server to kick off the spawning, so lets do that now. Inside ConnectionManager.cs on your Client you should have a SpawnPlayerOnServerRequest() method that GameManager calls when it starts. If you don’t, make it now and add the following:
public void SpawnLocalPlayerRequest()
{
    using (Message message = Message.CreateEmpty((ushort)Tags.SpawnLocalPlayerRequest))
    {
                Client.SendMessage(message, SendMode.Reliable);
    }
}
ASIDE: when it come to networking you typically want to send as small a message as you can get away with. Since requests that don’t have any additional parameters can be sent with just the Tag, these are very small and efficient and you should always consider if you actually *need* a payload struct to go with it.
Back to the Server. Inside ConnectedClient.cs inside your OnMessage block add a new case inside your switch statement:
case Tags.SpawnLocalPlayerRequest:
    OnSpawnLocalPlayerRequest();
    break;
ASIDE: Sometimes you might find you have a Tag that doesn’t *quite* mean what it implies. For instance, SpawnLocalPlayerRequest is not technically spawning the local player, it is requesting permission for the local player to spawn which kicks off code on the server. I do my best to keep things consistent but if you notice anything that you think would make more sense with a different name, go ahead and do that because it will make sense to *you*. I always try to add comments as well. They can be a pain, but when you put your project down for a month and come back to it without proper documentation you will often find it is less effort to start over which can lead into a cycle of starting and never finishing projects. Anywho…
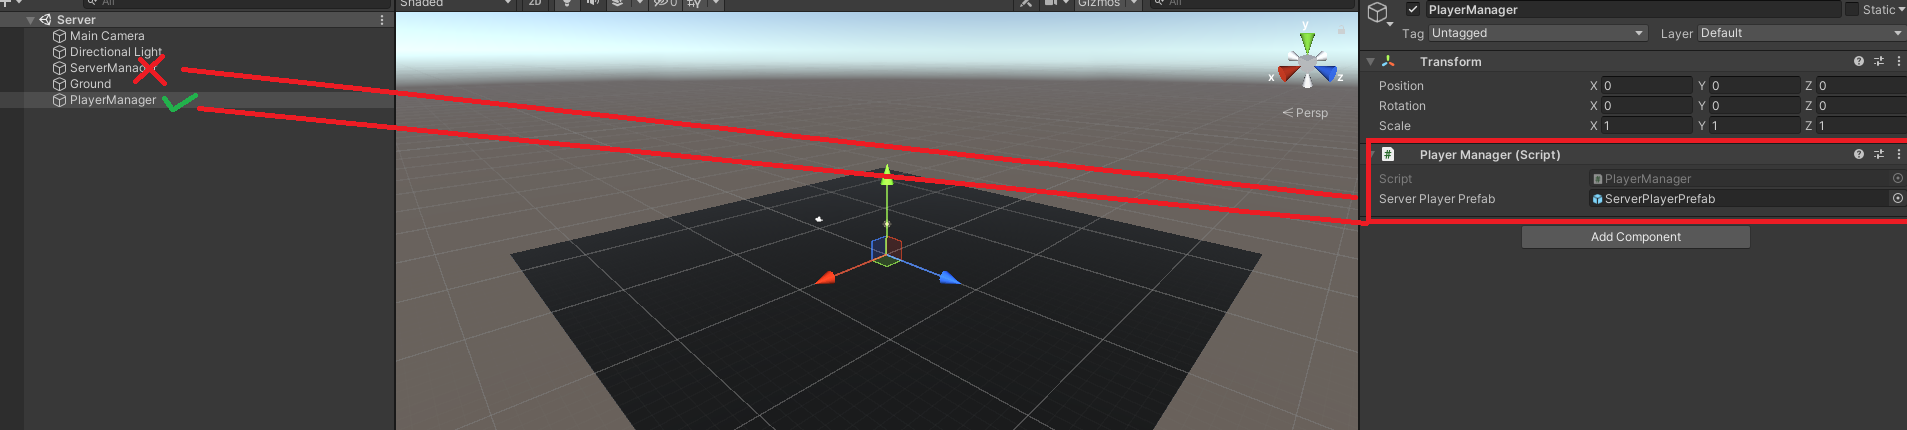
Create your OnSpawnLocalPlayerRequest method and add the following:
PlayerManager.Instance.SpawnPlayerOnServer(ClientID);
Save ConnectedClient.cs and in the inspector (on the server) right click and create a new empty game object and call it “PlayerManager”. As we have done, create a script of the same name and attach it:

ASIDE: Here is a diagram for how things will connect on the server side for the time being so you can picture what is going on/going to happen:
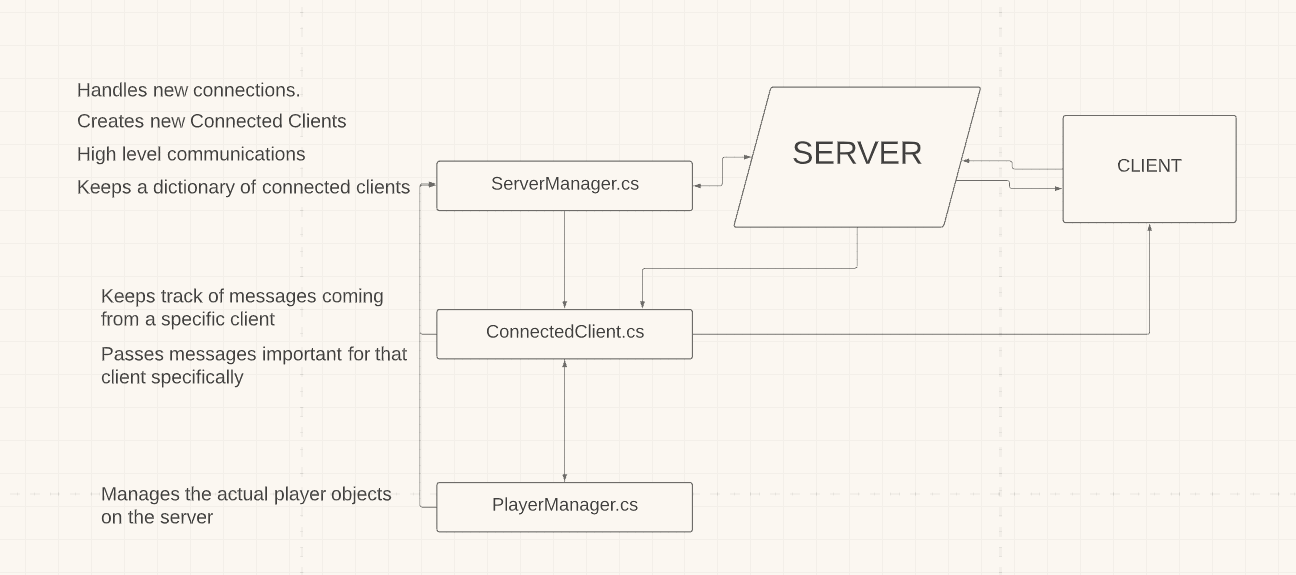
When a client connects for the first time, an instance of ConnectedClient is created and stored in ServerManager.cs. Subsequent messages from or to that client (that are client specific) go directly through the instance of ConnectedClient created for them. PlayerManager is what will handle the actions of the players on the server when they are spawned as game objects.
PlayerManager sometimes talks directly to the ServerManager (accessing the connected client list, etc). It also talks to the ConnectedClient to update that individual player stuff is happening. Later on, we will run some sort of “ProcessPlayerInput” inside of here to update the world state and alert all the connected players.
ServerManager will handle high level messaging, and will eventually have a handful of useful communication methods that we can access from other places to make our lives easier.
Spawn Player On Server
Moving on – open up PlayerManager.cs and change it to:
using System;
using System.Collections.Generic;
using UnityEngine;
using DarkRift;

namespace DarkRiftRPG
{
    public class PlayerManager : MonoBehaviour
    {
        public static PlayerManager Instance;

        public GameObject ServerPlayerPrefab;

        Dictionary<ushort, GameObject> CurrentPlayers = new Dictionary<ushort, GameObject>();

        void Awake()
        {
            if (Instance != null)
            {
                Destroy(gameObject);
                return;
            }
            Instance = this;
        }

        public void SpawnPlayerOnServer(ushort clientID)
        {
            if (!CurrentPlayers.ContainsKey(clientID))
            {
                GameObject go = Instantiate(ServerPlayerPrefab, ServerPlayerPrefab.transform.position, Quaternion.identity);
                CurrentPlayers.Add(clientID, go);

            }
        }
    }
}
Thats a big chunk of code to just paste in, but if you look you will see a lot of familiar faces. We want to be able to reference this PlayerManager, of which there will be only one. To do this, we setup our public static reference and then in Awake write what we need to make sure only one will exist. CurrentPlayers is going to hold a ushort, GameObject pair that will contain the ID of the players client and a reference to the prefab we spawn for that player. When SpawnPlayerOnServer is called from our ConnectedClient we will check to see if we have already spawned this player and if not, we instantiate it and add it to the CurrentPlayers dictionary.
REFACTOR: I did a small refactor with public GameObject ServerPlayerPrefab; – Since we are using PlayerManager to well… spawn and manage players it makes a lot more sense to move the prefab to this location and *remove* it from ServerManager.cs :
Ok great. Run the Server and start the Client. You should see a white capsule appear in the center of the game area on the Server.
Back inside SpawnPlayerOnServer() add
ServerManager.Instance.ConnectedClients[clientID].SpawnLocalPlayerOnClient();Since we are using the same key for CurrentPlayers as we are for ConnectedClients we have an easy link between the two. We access the client who requested the spawn through our ServerManager instance and call SpawnLocalPlayerOnClient() on that Client.
ASIDE: You can build the server to be headless, and in fact that is probably what you would want if you ever planned on hosting a real game. It is however *much* easier to code and debug if you can see what is going on. Down the road, I will probably have a post in this series about hosting headless in the cloud on something like AWS but for now don’t worry about any performance overhead we are incurring.
Cool. Lets get the player spawning on the client as well. Open up ConnectedClient.cs and under OnSpawnLocalPlayerRequest add:
public void SpawnLocalPlayerOnClient()
{
    using (Message message = Message.Create((ushort)Tags.SpawnLocalPlayerResponse, new SpawnLocalPlayerResponseData(ClientID)))
    {
        Client.SendMessage(message, SendMode.Reliable);
    }
}
ASIDE: I wanted to show you that you can also create your message struct inline as well as shown here. We may or may not end up needed that ClientID but for now we will keep it. I tend to like to have *some* way to identify the sender/receiver/message target even if it is implicit that we have this already. We can always refactor it out later.
PlayerManager.cs
using System;
using System.Collections.Generic;
using UnityEngine;
using DarkRift;

namespace DarkRiftRPG
{
    public class PlayerManager : MonoBehaviour
    {
        public static PlayerManager Instance;

        public GameObject ServerPlayerPrefab;

        Dictionary<ushort, GameObject> CurrentPlayers = new Dictionary<ushort, GameObject>();

        void Awake()
        {
            if (Instance != null)
            {
                Destroy(gameObject);
                return;
            }
            Instance = this;
        }

        public void SpawnPlayerOnServer(ushort clientID)
        {
            if (!CurrentPlayers.ContainsKey(clientID))
            {
                GameObject go = Instantiate(ServerPlayerPrefab, ServerPlayerPrefab.transform.position, Quaternion.identity);
                CurrentPlayers.Add(clientID, go);
                ServerManager.Instance.ConnectedClients[clientID].SpawnLocalPlayerOnClient();
            }
        }
    }
}
ConnectedClient.cs
using System.Collections;
using System.Collections.Generic;
using System;
using DarkRift.Server;
using DarkRift;

namespace DarkRiftRPG
{
    public class ConnectedClient
    {
        public ushort ClientID;
        public IClient Client;
        public ConnectedClient(IClient client)
        {
            Client = client;
            ClientID = client.ID;

            Client.MessageReceived += OnMessage;
        }

        private void OnMessage(object sender, MessageReceivedEventArgs e)
        {
            IClient client = (IClient)sender;
            using (Message message = e.GetMessage())
            {
                switch ((Tags)message.Tag)
                {
                    case Tags.SpawnLocalPlayerRequest:
                        OnSpawnLocalPlayerRequest();
                        break;
                }
            }
        }

        private void OnSpawnLocalPlayerRequest()
        {
            PlayerManager.Instance.SpawnPlayerOnServer(ClientID);
        }

        public void SpawnLocalPlayerOnClient()
        {
            using (Message message = Message.Create((ushort)Tags.SpawnLocalPlayerResponse, new SpawnLocalPlayerResponseData(ClientID)))
            {
                Client.SendMessage(message, SendMode.Reliable);
            }
        }

        public void OnClientDisconnected(object sender, ClientDisconnectedEventArgs e)
        {
            e.Client.MessageReceived -= OnMessage;
        }
    }
}
Spawn Player On Client
Back on the Client, open ConnectionManager and in OnMessage add the case for OnSpawnLocalPlayerResponse:
private void OnMessage(object sender, MessageReceivedEventArgs e)
        {
            using (Message m = e.GetMessage())
            {
                switch ((Tags)m.Tag)
                {
                    case Tags.JoinGameResponse:
                        OnPlayerJoinGameResponse(m.Deserialize<JoinGameResponseData>());
                        break;
                    case Tags.SpawnLocalPlayerResponse:
                        OnSpawnLocalPlayerResponse(m.Deserialize<SpawnLocalPlayerResponseData>());
                        break;
                }
            }
        }
Under OnMessage create the OnSpawnLocalPlayerResponse method as follows:
private void OnSpawnLocalPlayerResponse(SpawnLocalPlayerResponseData data)
{
    GameManager.Instance.SpawnLocalPlayer(data);
}
As shown way above, we want to keep our flow of data as decoupled and consistent as possible. The server sends a messages to this client, who gets it in ConnectionManager, and then passes it to the GameManager. You might notice that Instance is not showing up when you type GameManager.Instance – we need to make GameManager a singleton.
ASIDE: Singletons are certainly not the best approach in many cases and common wisdom is to avoid the allure of making every class you have that can be into one. Personally, for things that “manage” parts of the code and are only ever going to exist once and work for everything that needs them, singletons are the way to go.
Inside GameManager.cs add public static GameManager Instance; near the top. You can just paste over the Awake method from ConnectionManager. You can remove DontDestroyOnLoad since this will not travel between sceens. Now create your SpawnLocalPlayer method as and fill it out as shown:
public void SpawnLocalPlayer(SpawnLocalPlayerResponseData data)
{
    if (!ConnectedPlayers.ContainsKey(data.ID))
    {
        Instantiate(playerPrefab, playerPrefab.transform.position, Quaternion.identity);
    }
}
GameManager.cs
using System.Collections;
using System.Collections.Generic;
using UnityEngine;
using DarkRift;
using DarkRift.Client;
using System;

namespace DarkRiftRPG
{
    public class GameManager : MonoBehaviour
    {
        public static GameManager Instance;

        public GameObject playerPrefab;
        public Dictionary<ushort, GameObject> ConnectedPlayers = new Dictionary<ushort, GameObject>();
        public ushort LocalPlayerID;

        void Awake()
        {
            if (Instance != null)
            {
                Destroy(gameObject);
                return;
            }

            Instance = this;
        }

        private void Start()
        {
            LocalPlayerID = ConnectionManager.Instance.LocalClientID;
            Debug.Log("Local Player ID set to: " + LocalPlayerID);

            ConnectionManager.Instance.SpawnLocalPlayerRequest();
        }

        public void SpawnLocalPlayer(SpawnLocalPlayerResponseData data)
        {
            if (!ConnectedPlayers.ContainsKey(data.ID))
            {
                GameObject go = Instantiate(playerPrefab, playerPrefab.transform.position, Quaternion.identity);
                ConnectedPlayers.Add(data.ID, go);

            }
        }
    }
}
Congrats if you made it this far. If this feels like a lot of work, that’s because it is 🙂
If you test now you should see the player spawning on both the client and the server at pretty much the same time. Since we are on our local machine, lag isn’t really a factor. When we test later with the server hosted elsewhere, you will notice the delay.