
In Part 2 of this series, we created the client and server projects and the scripts needed for the client to be able to connect to the server and get a response. In Pt 3 we are going to write the code we need to store a player on the server when they connect and load into the game scene and learn about how to send messages in an easy and scalable way with DarkRift 2.
We are going to keep things simple and for now not worry about logging in/user names. When the player starts the game, they will enter the Login game scene and when connected to the server we will swap to the Game scene and spawn the player. Later on we can go back and add a proper login screen with a place for the players name, etc.
DarkRift Crash-Course
So, for the server and client to talk to each other we need to establish an agreed on message structure. The first thing we need is to define some tags. There are various ways to do this, but personally I like using an enum. Tags might look like:
public enum Tags
{
    LoginRequest = 0,
    LoginRequestAccepted = 1,
    LoginRequestDenied = 2,
}
We will use these tags to identify what type of message it is, and when we send it we will also include a “packet” of data with it to be read and used on the other end. I say “packet” because its not technically a packet in the normal networking sense of the word. The combination of the tag and the packet data make up our messages.
DarkRift 2 has two primary ways to send messages between the client and server. The first is to create a new DarkRiftWriter on the sender, write each value you need line by line, and on the receiving end make sure you read out the values in order with DarkRiftReader. This is not ideal – it does not scale well and can get messy quickly. It might look like:
Sender
DarkRiftWriter writer = DarkRiftWriter.Create();
writer.write("Hello")

Message message = Message.Create(tag, writer);
UnityClient.SendMessage(message);

writer.Dispose(); //Make sure to dispose to keep memory available
Reciever
DarkRiftReader reader = Message.GetReader();
reader.ReadString();
reader.Dispose(); //Make sure to dispose to keep memory available
You can also use using blocks to avoid having to remember to call Dispose():
using(DarkriftWriter writer = DarkriftWriter.Create())
{
    string clientToServergreeting = "Hello Server, this is the client"
    writer.Write(greeting);
    using(Message message = message.Create(tag, writer))
    {
         UnityClient.SendMessage(message, sendmode);
    }
}
With “tag” being something like Tags.SendGreeting we would add in our enum above. Sendmode can either be SendMode.Reliable or SendMode.Unreliable for TCP and UDP respectively. You can mix and match different send types in your project, so remember to check this if you run into odd issues as part of your mental debugging checklist. Because this is going to be a click to move style game, we will mostly be sticking with the Reliable approach.
The second way involves creating pre-defined structs to hold your messages, filling out those structs with values, and letting DarkRift worry about serialization and deserialization for you. This might look like:
public struct GreetingData : IDarkRiftSerializable
{
    public string Greeting;

    public GreetingData(string greeting)
    {
        Greeting = greeting;
    }

    public void Deserialize(DeserializeEvent e)
    {
        Greeting = e.Reader.ReadString();
    }

    public void Serialize(SerializeEvent e)
    {
        e.Writer.Write(Greeting);
    }
}
You can see we are using the IDarkRiftSerializable interface, this interface lets us use DarkRift to easily serialize and de-serialize (Not to mention, we *need* those two methods you see under the public constructor for IDarkRiftSerializable to work).
A couple important things to note:
- Everything *must* be public or things will not read/write correctly. I have lost a lot more time then I would like to admit by accidently neglecting to make something public in one of these. It tends to fail silently since technically it is valid code.
- Everything must be in the correct order. What I mean is that if you have a slightly more complicated struct:
public struct PlayerMovementRequest : IDarkRiftSerializable
{
    public ushort ID;
    public Vector2 ClickPos;
    public Time TimeStamp;

    public PlayerMovementRequest(ushort id, Vector2 clickPos, Time stamp)
    {
        ID = id;
        ClickPos = clickPos;
        TimeStamp = stamp;
    }

    public void Deserialize(DeserializeEvent e)
    {
        ID = e.Reader.ReadUInt16();
        ClickPos = e.Reader.ReadVector2();
        TimeStamp = e.Reader.ReadUInt32();
    }

    public void Serialize(SerializeEvent e)
    {
        e.Writer.Write(ID);
        e.Writer.WriteVector2();
        e.Writer.Write(TimeStamp);
    }
}
you need to make sure that the order or reading matches the order you write in or you will not get the behavior you expect. Note that out of the box DarkRift does not support reading or writing Vector2 or other such Unity niceties, however the same person who created the EmbeddedFPS tutorial (which is how I got started with this) also created some extension methods to handle things like quaternions and vector2/3s and the like. Check it out HERE.
Once you have a message struct and a tag to go with it you can send it like:
string clientToClientGreeting = "Hello server!"
using (Message message = Message.Create((ushort)Tags.SendGreeting, new GreetingData(greeting)))
{
    ConnectionManager.Instance.Client.SendMessage(message, SendMode.Reliable);
}
This example is Client -> Server. A server communicating back would look like:
string serverToClientGreeting = $"Hello client {client.ID}, this is the server"
using (Message m = Message.Create((ushort)Tags.GreetingRecieved, new GreetingData (serverToClientGreeting))
{
    client.SendMessage(m, SendMode.Reliable);
}
In this case the server would have code that would allow it to identify each client and send the greeting back to the correct one.
If you want a deeper introduction with DarkRift basics before moving forward I highly suggest you follow the official tutorial – even if you don’t build that project, at least skim through it and also take a look at the reference documentation
Lets Make It happen
When the client connects to the server, we will get “Connected to server!” from our ConnectCallback in ConnectionManager in our Login scene. When we get this, we will load the game scene on the client. We will need to make a play area to… play in… on both the client and server as well.
Next, the client will send the server a spawn request message. When the server gets this, it will check to see if a client with that ID already exists internally (DarkRift has an internal list of client connections).
Assuming all is good (the client does not exist on the server) we will tell the client that it can go ahead and spawn the player.
The first client to connect will get an ID of 0, the next an ID of 1, etc. Note that if client 0 disconnects from the server with itself and client 1 connected and reconnects it will get an ID of 2 – we will need to write our own code to allow for reconnection.
We will also write some code to help us keep track of each players connection along with some other information to help us manage each player more easily in our own code.
Creating Our Network Messages
First, in the Client project open up NetworkMessages.cs in the Scripts/Shared folder. You can get rid of MonoBehaviour – we won’t need it here. Delete Start and Update. Delete the class NetworkMessages. Your file should look like:
using System.Collections;
using System.Collections.Generic;
using UnityEngine;
using DarkRift;
Great. Create a public enum called Tags as follows:
public enum Tags
{
    JoinGameRequest,
    JoinGameResponse,
}
Under that we need to create our JoinGameResponse struct (the request will be an empty message consisting of just the tag):
public struct JoinGameResponseData : IDarkRiftSerializable
{
    public bool JoinGameRequestAccepted;

    public JoinGameResponseData(bool accepted)
    {
        JoinGameRequestAccepted = accepted;
    }
    public void Deserialize(DeserializeEvent e)
    {
        JoinGameRequestAccepted = e.Reader.ReadBoolean();
    }

    public void Serialize(SerializeEvent e)
    {
        e.Writer.Write(JoinGameRequestAccepted);
    }
}
NetworkMessages.cs should now look like:
using System.Collections;
using System.Collections.Generic;
using UnityEngine;
using DarkRift;

public enum Tags
{
    JoinGameRequest,
    JoinGameResponse,

}

public struct JoinGameResponseData : IDarkRiftSerializable
{
    public bool JoinGameRequestAccepted;

    public JoinGameResponseData(bool accepted)
    {
        JoinGameRequestAccepted = accepted;
    }
    public void Deserialize(DeserializeEvent e)
    {
        JoinGameRequestAccepted = e.Reader.ReadBoolean();
    }

    public void Serialize(SerializeEvent e)
    {
        e.Writer.Write(JoinGameRequestAccepted);
    }
}
Save this script. Now, in the Server project create a matching file. It is *critical* that both the client and server have matching NetworkMessages.cs files. Typically I write new messages and tags on the Client, and then copy the changes over. There are other ways to do this but it works fine as long as you keep track of which file belongs to which project.
Setting Up The Game Scene
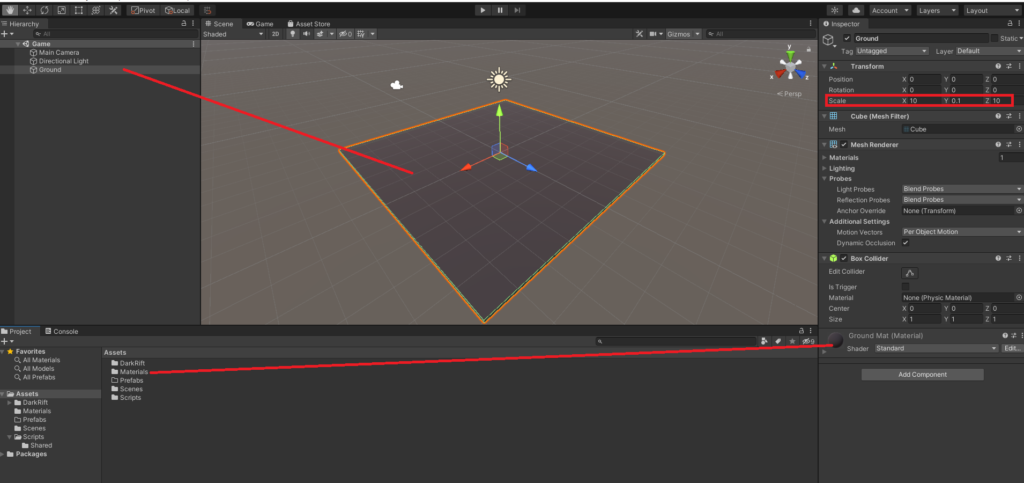
Lets blast through some setup. In the Client project, create a Materials folder and a Prefabs folder. Open up the Game scene and create a cube named Ground. Create a material named GroundMat, make it… ground colored, and assign it to the cube (change the scaling on the ground to be 50×50 – 10×10 isn’t going to cut it when we add the player):
Once we have our 50×50 ground, right click in the hierchy and create a capsule. Reset it’s transform and set it’s Y position value to 1. Rename it Player and tag it as such:
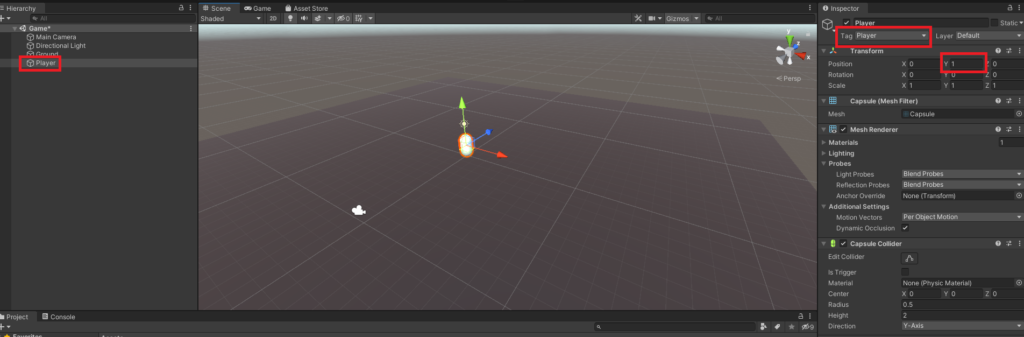
In your Materials folder, create a LocalPlayerMat and a NetworkPlayerMat, and give them different colors. I am going with green for the local player and blue for other players. Drag your Player capsule into the prefabs folder and delete it from the scene.
OnConnection – Requesting To Join
Inside ConnectionManager.cs where we have:
if (Client.ConnectionState == ConnectionState.Connected)
{
    Debug.Log("Connected to server!");
}
Add the following under our Debug:
OnConnectedToServer();Create the OnConnectedToServer method as follows:
private void OnConnectedToServer()
{
   using (Message message = Message.CreateEmpty((ushort)Tags.JoinGameRequest))
   {
      Client.SendMessage(message, SendMode.Reliable);
   }
}
This will be called as soon as our connection state to the server registers as connected.
Listening For Client Messages
Switch back to the Server project and inside ServerManager.cs, inside of OnMessage add:
private void OnMessage(object sender, MessageReceivedEventArgs e)
{
    IClient client = (IClient) sender;
    using (Message message = e.GetMessage())
    {
        switch ((Tags) message.Tag)
        {
            case Tags.JoinGameRequest:
                OnPlayerJoinGameRequest(client);
                break;
        }
    }
}
Typically you would have a login scene with username/password fields on the Client and there would be some extra steps but I want to keep things as simple as possible. The EmbeddedFPS tutorial includes that step if you want to see an example.
Handling New Clients
Before we can add players to our server we will need our own way to keep track of them. In your project, create a new C# script called “ConnectedClient” as follows:
using System.Collections;
using System.Collections.Generic;
using System;

public class ConnectedClient
{
    public IClient Client;
    public ushort ClientID;

    public ConnectedClient(IClient client)
    {
        Client = client;
        ClientID = client.ID;
    }
}
We will add to this as needed. Typically ConnectedClient would also hold information like the players name, IP, or anything else you want to keep track of that is connection related. At the top of ServerManager.cs below our Instance add:
public Dictionary<ushort, ConnectedClient> ConnectedClients = new Dictionary<ushort, ConnectedClient>();
Now, lets create and deal with our OnSpawnPlayerRequest. Below OnMessage add:
private void OnPlayerJoinGameRequest(IClient client)
{
    JoinGameResponseData data = new JoinGameResponseData();
    if (ConnectedClients.ContainsKey(client.ID))
    {
        data.JoinGameRequestAccepted = false;

        using (Message message = Message.Create((ushort)Tags.JoinGameResponse, data))
        {
            client.SendMessage(message, SendMode.Reliable);
        }
        return;
    } else
    {
        data.JoinGameRequestAccepted = true;

        client.MessageReceived -= OnMessage;

        ConnectedClient c = new ConnectedClient(client.ID);
        ConnectedClients.Add(c.ClientID, c);

        using (Message message = Message.Create((ushort)Tags.JoinGameResponse, data))
        {
            client.SendMessage(message, SendMode.Reliable);
        }
    }
}
Lets break this down. First, we create a new SpawnPlayerResponseData. Next, we check to see if this client is already in the ConnectedClients dictionary. If it is, the spawn request is denied and we alert the player. Otherwise, we accept the spawn request, deregister the listener for the client in ServerManager (each ConnectedClient is going to keep track of it’s own messages later), create a new ConnnectClient, and add it to our ConnectedClients dictionary. We then tell the player all is good so they can change scenes and spawn.
So, Now your ConnectedClient.cs should look like (same as above):
using System.Collections;
using System.Collections.Generic;
using System;
using DarkRift.Server;
using DarkRift;

public class ConnectedClient
{
    public ushort ClientID;
    public IClient Client;

    public ConnectedClient(IClient client)
    {
        Client = client;
        ClientID = client.ID;
    }
}
And your ServerManager should look like:
ServerManager.cs
using System;
using System.Collections.Generic;
using DarkRift;
using DarkRift.Server;
using DarkRift.Server.Unity;
using UnityEngine;

namespace DarkRiftRPG
{
    public class ServerManager : MonoBehaviour
    {
        public static ServerManager Instance;

        public Dictionary<ushort, ConnectedClient> ConnectedClients = new Dictionary<ushort, ConnectedClient>();

        private XmlUnityServer xmlServer;
        private DarkRiftServer server;

        void Awake()
        {
            if (Instance != null)
            {
                Destroy(gameObject);
                return;
            }
            Instance = this;
            DontDestroyOnLoad(this);
        }

        void Start()
        {
            xmlServer = GetComponent<XmlUnityServer>();
            server = xmlServer.Server;
            server.ClientManager.ClientConnected += OnClientConnected;
            server.ClientManager.ClientDisconnected += OnClientDisconnected;
        }

        void OnDestroy()
        {
            server.ClientManager.ClientConnected -= OnClientConnected;
            server.ClientManager.ClientDisconnected -= OnClientDisconnected;
        }

        private void OnClientDisconnected(object sender, ClientDisconnectedEventArgs e)
        {
            e.Client.MessageReceived -= OnMessage;
        }

        private void OnClientConnected(object sender, ClientConnectedEventArgs e)
        {
            e.Client.MessageReceived += OnMessage;
        }

        private void OnMessage(object sender, MessageReceivedEventArgs e)
        {
            IClient client = (IClient)sender;
            using (Message message = e.GetMessage())
            {
                switch ((Tags)message.Tag)
                {
                    case Tags.JoinGameRequest:
                        OnPlayerJoinGameRequest(client);
                        break;
                }
            }
        }

        private void OnPlayerJoinGameRequest(IClient client)
        {
            JoinGameResponseData data = new JoinGameResponseData();
            if (ConnectedClients.ContainsKey(client.ID))
            {
                data.JoinGameRequestAccepted = false;

                using (Message message = Message.Create((ushort)Tags.JoinGameResponse, data))
                {
                    client.SendMessage(message, SendMode.Reliable);
                }
                return;
            } else
            {
                data.JoinGameRequestAccepted = true;

                client.MessageReceived -= OnMessage;

                ConnectedClient c = new ConnectedClient(client);
                ConnectedClients.Add(c.ClientID, c);

                using (Message message = Message.Create((ushort)Tags.JoinGameResponse, data))
                {
                    client.SendMessage(message, SendMode.Reliable);
                }
            }
        }
    }
}
Listening For Server Messages And Loading The Game Scene
Back on the Client, open up ConnectionManager. At the top, add using DarkRift.Client; We need to be able to listen to messages coming from the server so add:
Client.MessageReceived += OnMessage;inside of Start. Create the OnMessage method as shown:
private void OnMessage(object sender, MessageReceivedEventArgs e)
{
    using (Message m = e.GetMessage())
    {
        switch ((Tags)m.Tag)
        {
            case Tags.JoinGameResponse:
                OnJoinGameResponse(m.Deserialize<JoinGameResponseData>());;
                break;
        }
    }
}
Create the OnSpawnPlayerResponse method:
private void OnJoinGameResponse(JoinGameResponseData data)
{
    if (!data.JoinGameRequestAccepted)
    {
        Debug.Log("houston we have a problem");
        return;
    }

    SceneManager.LoadScene("Game"); // Make sure you add Using UnityEngine.SceneManagement
}
And make sure you add an OnDestroy for cleanup at the bottom:
private void OnDestroy()
{
    Client.MessageReceived -= OnMessage;
}
ConnectionManager should now look as follows:
ConnectionManager.cs
using System;
using System.Net;
using DarkRift;
using DarkRift.Client;
using DarkRift.Client.Unity;
using UnityEngine;
using UnityEngine.SceneManagement;

namespace DarkRiftRPG
{
    public class ConnectionManager : MonoBehaviour
    {
        //We want a static reference to ConnectionManager so it can be called directly from other scripts
        public static ConnectionManager Instance;
        //A reference to the Client component on this game object.
        public UnityClient Client { get; private set; }

        public ushort LocalClientID;

        void Awake()
        {
            if (Instance != null)
            {
                Destroy(gameObject);
                return;
            }

            Instance = this;
            DontDestroyOnLoad(this);
        }
        void Start()
        {
            Client = GetComponent<UnityClient>();
            Client.ConnectInBackground(IPAddress.Loopback, Client.Port, false, ConnectCallback);
            Client.MessageReceived += OnMessage;
        }
        private void ConnectCallback(Exception e)
        {
            if (Client.ConnectionState == ConnectionState.Connected)
            {
                Debug.Log("Connected to server!");
                OnConnectedToServer();

            }
            else
            {
                Debug.LogError($"Unable to connect to server. Reason: {e.Message} ");
            }
        }

        private void OnConnectedToServer()
        {
            using (Message message = Message.CreateEmpty((ushort)Tags.SpawnPlayerRequest))
            {
                Client.SendMessage(message, SendMode.Reliable);
            }
        }

        private void OnMessage(object sender, MessageReceivedEventArgs e)
        {
            using (Message m = e.GetMessage())
            {
                switch ((Tags)m.Tag)
                {
                    case Tags.JoinGameResponse:
                        OnJoinGameResponse(m.Deserialize<JoinGameResponseData>());
                        break;
                }
            }
        }

        private void OnJoinGameResponse(JoinGameResponseData data)
        {
            if (!data.JoinGameRequestAccepted)
            {
                Debug.Log("houston we have a problem");
                return;
            }

            SceneManager.LoadScene("Game");
        }

        private void OnDestroy()
        {
            Client.MessageReceived -= OnMessage;
        }
    }
}
Build And Test
Phew! That was a lot. Save the script, and under File->Build Settings add both the Login and Game scene:
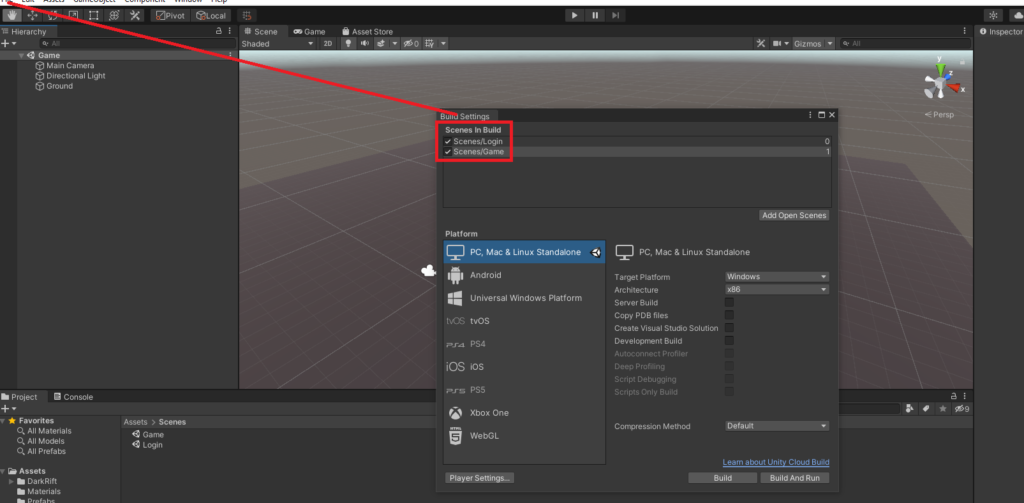
You can close the build settings. Lets make sure everything works with *one* client. Make *SURE* you are in your Login Scene. Start the server and then the client. If all goes well, you should after a very brief delay find yourself in the Game scene on the client.
Congratulations! We now have everything we need to instantiate the local player. This post is getting a tad long so I am going to show you how to spawn the player and deal with movement in the next post.