
In the LAST section, we integrated PlayFab with Unity on both the Client and Server projects, and wrote code that would allow players to either sign in or sign up. On top of that, we are now passing the PlayFabID for the logged-in player to the server so we can make Server API calls to PlayFab securely. In this post, we are going to work on a player character creation and selection screen that will allow new players to create a character or join the game with an existing one.
I am going to cover some PlayFab features that I have not found many resources for (character creation on the backend being a big one). In-fact, despite characters being mentioned all over the API docs, the *only* useable example I have found to work with is THIS blog post. I will confess, I have not been a huge fan of the Microsoft docs so far.. it’s like finding a needle in a haystack made of needles and you already have to know what you want…
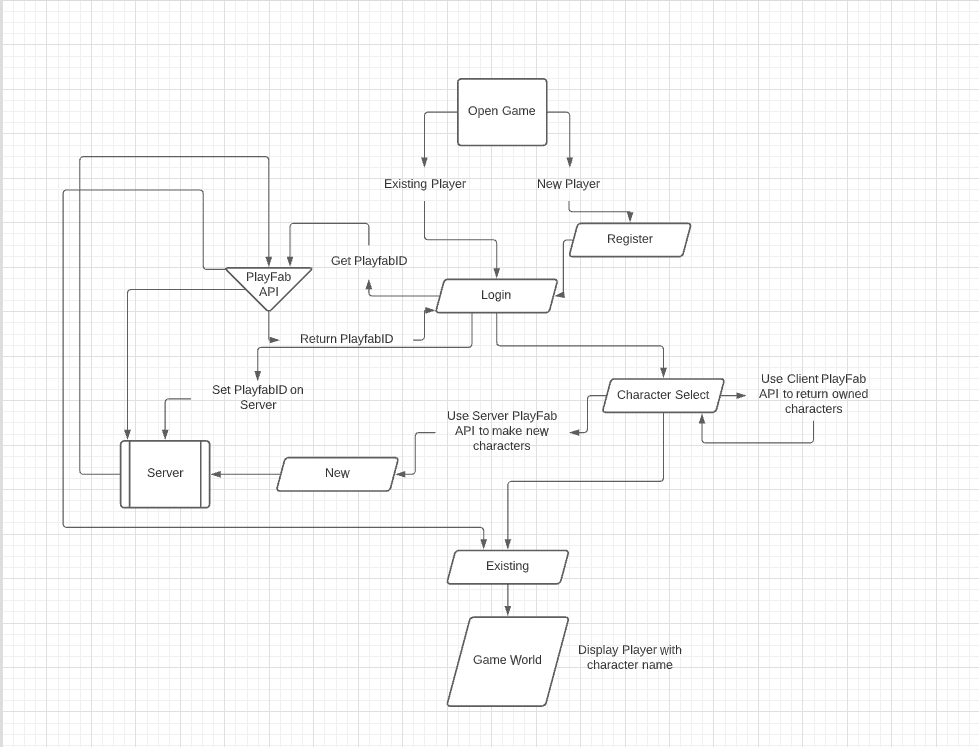
Before we dive in, here is a diagram of what we are building out:
Lets step through this so we can logically follow what is going on. It is very easy to have your code become a mess when you start adding more and more features so I will do my best to keep things clean and straight forward.
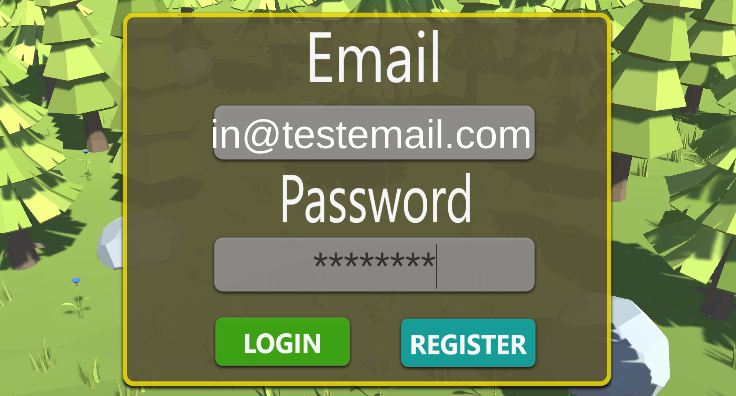
First, the player opens the game and is shown the login/register screen. If they are an existing player, they can login which will by extension connect to our Server passing it the PlayFabID for that player. If they are a new player, they can register an account and then login.
After the player signs in with a valid account, we will show a character creation/select panel. If the player has an existing character they will be able to select it and join the game world. If they do not have an existing character, they will have the option to make one.
In PlayFab, there is a concept that a player can have many characters, and each character can have it’s own inventory, stats, etc. The actual values you populate a character with are *incredibly* arbitrary but since this is an RPG style game we are at a minimum going to want a player name, level, XP, and gold (which we can display on the character select screen). We will deal with setting up “gold” later as that will involve the PlayFab currency system, for now we will just have a key/value pair “Gold: 0”.
We will let the client make a call to return all owned characters. However, we will only create characters with Server API calls so when we create our player character we will be sending the name along with any other information we need to our Server to make the call.
This is getting a little into the weeds, but from my understanding PlayFab’s character system shines for the following use cases:
- RPG character slots (MMO or not)
- MOBA style champions (each champion would be a character you can grant to a player, LoL/DOTA)
- Any Gacha style collect-a-waifu type of game (Genshin Impact, etc)
- Any creature collector (Pokemon)
However since it is just an arbitrary set of key value pair your imagination is really the limit. PlayFab doesn’t support any specific style/template out of the box but you can make it fit your own.
PlayFab supports to ways to grant a player a new character – either through the Admin API directly (server side) or through the Client API on the game client IF that player has a redeemable item they have purchased they can use to say “Hey PlayFab, I have this token I previously got from the server, give me this character in exchange”.
I am going to be using the first approach for this part of the series, but if I ever get around to expanding on the original scope of the project after the series has its core content (chat, combat, resources, trading, crafting) to something like a simple pet system perhaps that would be a good place to show the other method.
Ok, that is enough preamble, lets get crackin’
Retrieve Existing Characters
The first thing we want to do after logging in on the Client is to show a character selection screen. We will make a Client API call to PlayFab to return all owned characters. Since there won’t be any, we should get zero back.
You might note that right now logging in is enough to load the game, and we don’t want that. On the Client, inside ConnectionManager in our OnMessage block, lets rename
OnPlayerJoinGameResponse(m.Deserialize<JoinGameResponseData>());to
OnPlayerJoinServerResponse(m.Deserialize<JoinGameResponseData>());
and create that method. In NetworkMessages lets rename JoinGameResponseData to JoinServerResponseData and update any references we need. Don’t forget to also do this on the Server:
public struct JoinServerResponseData : IDarkRiftSerializable
{
    public bool JoinServerRequestAccepted;

    public JoinServerResponseData(bool accepted)
    {
        JoinServerRequestAccepted = accepted;
    }
    public void Deserialize(DeserializeEvent e)
    {
        JoinServerRequestAccepted = e.Reader.ReadBoolean();
    }

    public void Serialize(SerializeEvent e)
    {
        e.Writer.Write(JoinServerRequestAccepted);
    }
}
You will need to update some references in ServerManager.cs (I also suggest you update the method name in OnMessage to be OnPlayerJoinServerRequest to stay consistent).
Once you have your reference updated in both projects, swap back to the Client and inside OnPlayerJoinServerResponse add:
private void OnPlayerJoinServerResponse(JoinServerResponseData data)
{
    if (!data.JoinServerRequestAccepted)
    {
        Debug.Log("Unable to join server");
        return;
    }

    LocalClientID = Client.Client.ID;

    PlayFabLoginManager.Instance.OpenCharacterSelectPanel();
}
This is very similar to what we had in OnPlayerJoinGameResponse but this time we want to tell the login manager to load the Character Select scene (which we will build shortly). For now, lets keep abusing singletons and turn PlayFabManager.cs into one as we have with our other files. Under our UI references at the top of that file add:
public static PlayFabLoginManager Instance;

void Awake()
{
    if (Instance != null)
    {
        Destroy(gameObject);
        return;
    }

    Instance = this;

}
We don’t care if it gets destroyed on load, in our game scene we will have another file for additional client side API calls to PlayFab.
We need a new UI screen, so just like our Login and Register ones, create a new panel in the UI named “CharacterSelectPanel” – you can use a UI panel but I suggest using an empty game object for this (and for the others). This is my setup:
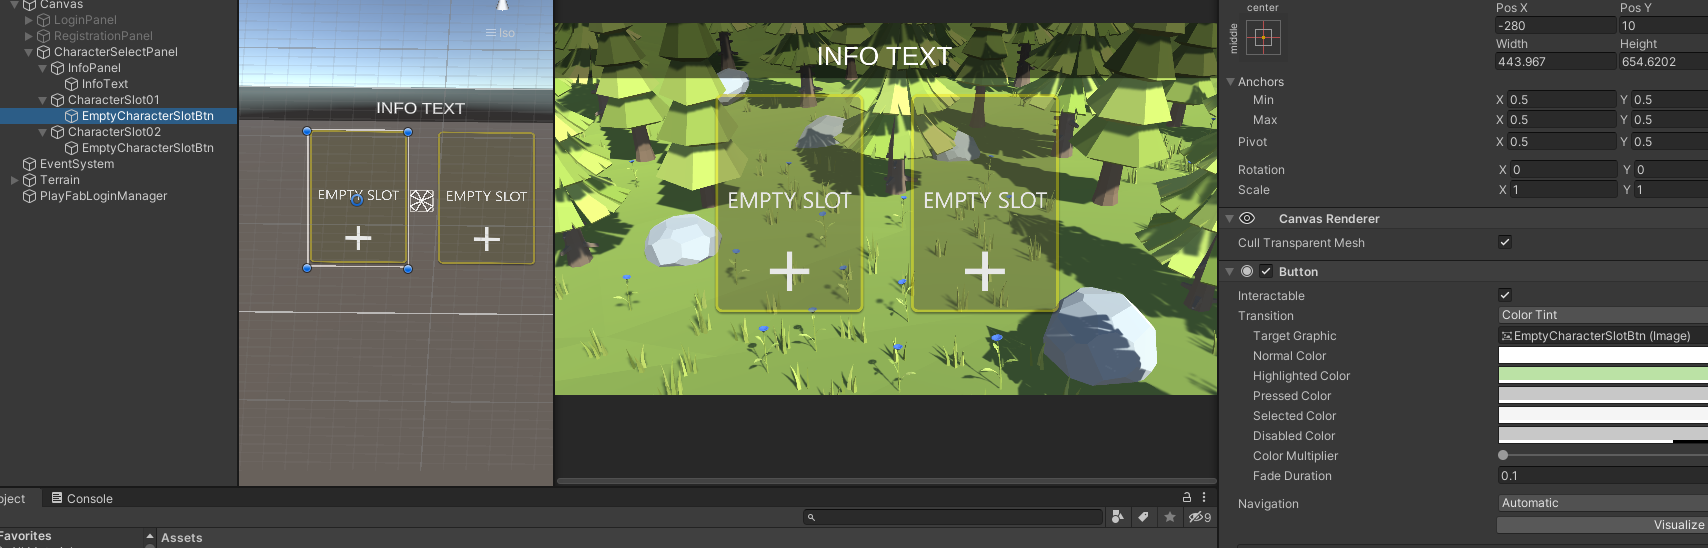
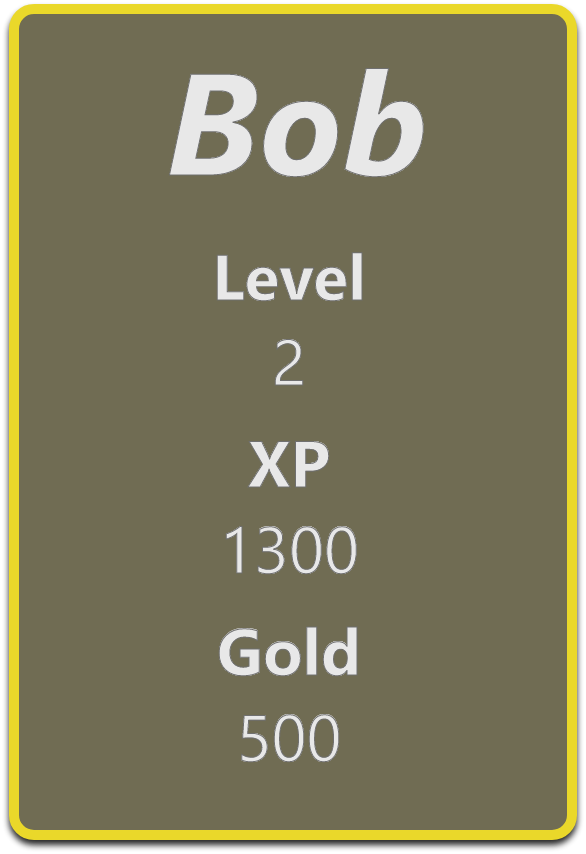
For now, I have decided to allow a player to have two character slots. There isn’t any real reason for this, but I think it will be a good way to show how to use PlayFab to unlock a character slot down the road. I also created a panel to display some information to confirm our calls are working – it is just a panel with some opacity and a text field as a child. The way I am going to do this is to have an empty game object to hold our slots, and depending on if the slot is empty or if a player has a character, show a different button to choose from. A character that exists would display something like:
Now that we have all that, we can create our OpenCharacterSelectPanel() method inside PlayFabLoginManager.cs:
public void OpenCharacterSelectPanel()
{
LoginPanel.SetActive(false);
RegisterPanel.SetActive(false);
CharacterSelectPanel.SetActive(true);
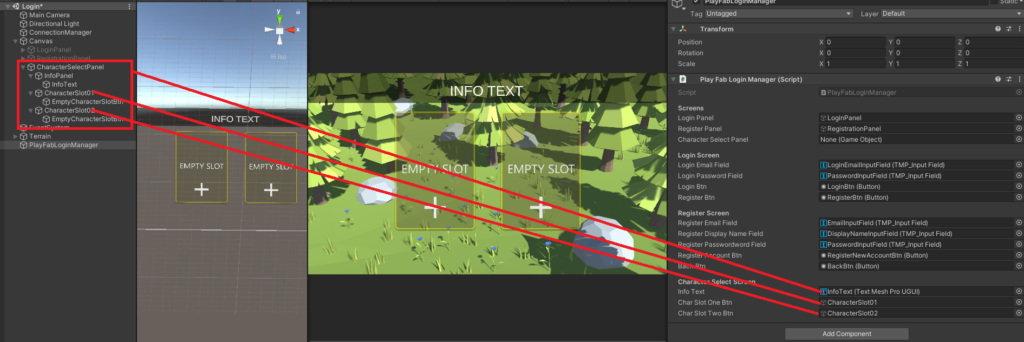
}We also need to add a reference at the top under our “Screens” header and create a new section to hold our text and two create character buttons:
[Header("Screens")]
public GameObject LoginPanel;
public GameObject RegisterPanel;
public GameObject CharacterSelectPanel;
[Header("Character Select Screen")]
public TMP_Text InfoText;
public GameObject CharSlotOneBtn;
public GameObject CharSlotTwoBtn;Now, this is getting to be a little bit in the direction of “hard coded” which we want to avoid, but for now lets focus on getting it working. Later on, we will probably want to refactor if we need to keep adding screens. In fact, the next time it happens, that is what I will do.
Save the file, and as with the other two panels wire up the UI:
Alright, lets test. Disable the CharacterSelectPanel in the inspector and re-activate the LoginPanel. Before we test, inside ServerManager.cs we need to comment out Destroy(PlayerManager.Instance.CurrentPlayers[e.Client.ID]); inside OnClientDisconnected since we won’t have a server player to destroy yet. Start the server, then the client, and if all goes well we should end up on our new character select screen.
Now that that is working, we want to make a client side API call to retrieve any characters this player already owns. Inside PlayFabLoginManager at the bottom add a new method:
public void OnTryRetrieveCharacters()
{
    ListUsersCharactersRequest listUsersCharactersRequest = new ListUsersCharactersRequest
    {
        PlayFabId = ConnectionManager.Instance.LocalPlayerPlayFabID
    };

    PlayFabClientAPI.GetAllUsersCharacters(listUsersCharactersRequest,
    res =>
    {
        Debug.Log("Characters owned: " + res.Characters.Count);
    },
    err =>
    {
        Debug.Log("Error: " + err.ErrorMessage);
    });
}
This code is based on the example shown in the Client API docs. The GetAllUserCharacters returns an array of characters inside the result. Here, we are just logging out the count (it should be 0). Where you open the character select panel, add a call to this method. Test again by running both projects, you should see something like:
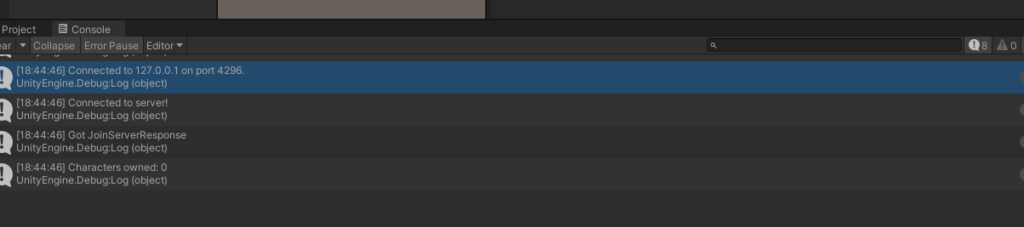
This is exactly what we want, and what we are expecting.
Creating New Characters
Here is how we are going to approach making a new character:
- The player will make the API call to see what characters they have.
- For every character that comes back (out of two maximum) we will display the appropriate UI to allow the player to select that character to join the game with.
- If there are no characters or there is a free character slot we will show the UI to create a new character
- If the player wants to create a new character we will display a form that will let them pick a name for that character.
- We will pass that name to the Server where we will make an API call to create a new character if the player has less then 2 existing ones.
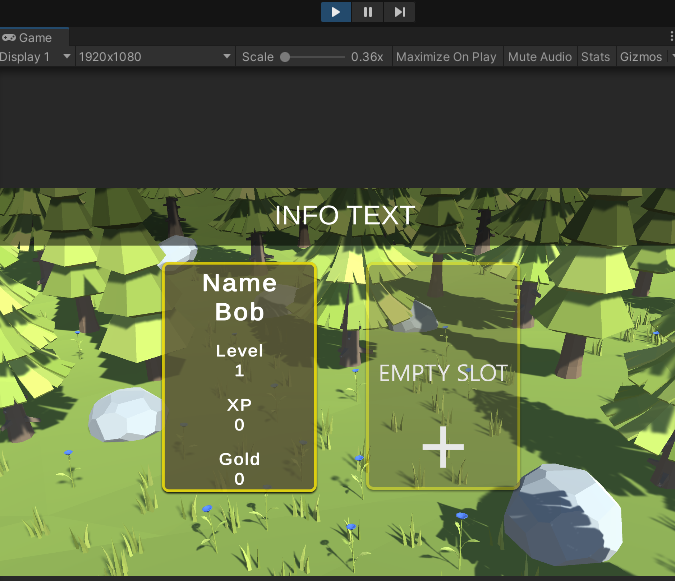
- We will alert the client of success/failure of character creation and refresh the character select UI. We will show a nice character info slot as shown above.
We already have a start on the first step. Since the player at this point should have no characters, we will display both of the EmptyCharacterSlotBtn UI Elements. You will want to create some sort of UI to show for when the player does have characters. I am going to make mine like the image above. This will consist of a background image and several text fields to display the name, level, xp, and gold for that character.
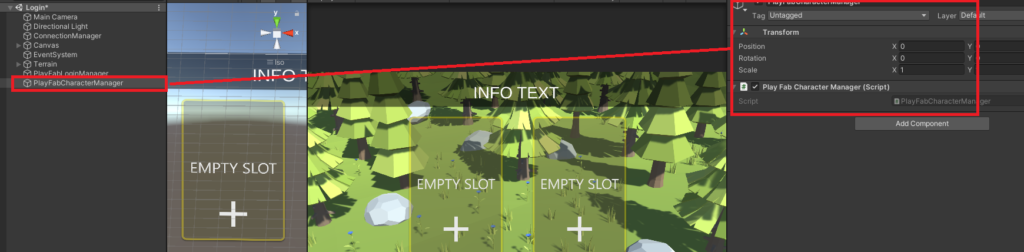
Next we want to create a character. I was originally going to put this code inside PlayFabLoginManager but since this is dealing with character creation/selection I think it is a good idea to make a new script. Right click in the hierarchy, create an empty game object called “PlayFabCharacterManager” and attach a script with the same name:
Open up that script and add our PlayFab references:
using UnityEngine;
using System.Collections.Generic
using PlayFab;
using PlayFab.ClientModels;
using TMPro;
using System;
using UnityEngine.UI;

public class PlayFabCharacterManager : MonoBehaviour
{

}
I think it makes sense to have this class hold a list of characters returned from PlayFab. At the top add:
public List<CharacterResult> Characters = new List<CharacterResult>();While we are at it, lets do a minor refactor – move the OnTryRetrieveCharacters method from PlayFabLoginManager to our new file, turn PlayFabCharacterManager into a Singleton (handy little suckers) and update our call to OnTryRetrieveCharacters inside the login manager to:
PlayFabCharacterManager.Instance.OnTryRetrieveCharacters();
PlayFabCharacterManager should now look like (note the namespace):
using UnityEngine;
using System.Collections.Generic;
using PlayFab;
using PlayFab.ClientModels;
using TMPro;
using System;
using UnityEngine.UI;

namespace DarkRiftRPG
{
    public class PlayFabCharacterManager : MonoBehaviour
    {
        public List<CharacterResult> Characters = new List<CharacterResult>();

        public static PlayFabCharacterManager Instance;
        void Awake()
        {
            if (Instance != null)
            {
                Destroy(gameObject);
                return;
            }

            Instance = this;
        }
        public void OnTryRetrieveCharacters()
        {
            ListUsersCharactersRequest listUsersCharactersRequest = new ListUsersCharactersRequest
            {
                PlayFabId = ConnectionManager.Instance.LocalPlayerPlayFabID
            };

            PlayFabClientAPI.GetAllUsersCharacters(listUsersCharactersRequest,
            res =>
            {
                Debug.Log("Characters owned: " + res.Characters.Count);
            },
            err =>
            {
                Debug.Log("Error: " + err.ErrorMessage);
            });
        }

    }
}
This moves code that has really nothing to do with logging-in to a more logical location.
Next, we want to store the result of our call to get characters in our list. In our response callback for OnTryRetrieveCharacters add:
if (Characters.Count > 0)
    Characters.Clear();

foreach (CharacterResult characterResult in res.Characters)
{
    Characters.Add(characterResult);
}
Now we have a local version of the most recent character data, and if a player logs out (which we will support later) we will make sure that we clear our list to avoid adding duplicates and to make sure our characters are the most up to date when we log in.
So we can more easily manage which version of the character slot to show (existing or empty) we need a reference to our CharacterSlot01 and CharacterSlot02. Inside PlayFabCharacterManager add two references at the top and in the inspector set those references. Under our foreach add “ShowCharacterSlotButtons();” and create that method:
private void ShowCharacterSlotButtons()
{
    PlayerCharacterSlot1.transform.GetChild(0).gameObject.SetActive(false);
    PlayerCharacterSlot1.transform.GetChild(1).gameObject.SetActive(false);
    PlayerCharacterSlot2.transform.GetChild(0).gameObject.SetActive(false);
    PlayerCharacterSlot2.transform.GetChild(1).gameObject.SetActive(false);

    switch (Characters.Count)
    {
        case 0:
            //No characters
            PlayerCharacterSlot1.transform.GetChild(0).gameObject.SetActive(true);
            PlayerCharacterSlot2.transform.GetChild(0).gameObject.SetActive(true);
            break;
        case 1:
            //One character
            PlayerCharacterSlot1.transform.GetChild(1).gameObject.SetActive(true);
            PlayerCharacterSlot2.transform.GetChild(0).gameObject.SetActive(true);
            break;
        case 2:
            //Two characters
            PlayerCharacterSlot1.transform.GetChild(1).gameObject.SetActive(true);
            PlayerCharacterSlot2.transform.GetChild(1).gameObject.SetActive(true);
            break;
        default:
            break;
    }

}
This is a fairly… crude approach but right now I just want to get it all working. You can always refactor later to make your UI code cleaner 🙂
Great, now we need to actually let the player create a new character. In the same file add two new methods:
public void OpenCreateNewCharacterPrompt()
{
NewCharacterCreatePanel.SetActive(true);
}
public void CloseCreateNewCharacterPrompt()
{
NewCharacterCreatePanel.SetActive(false);
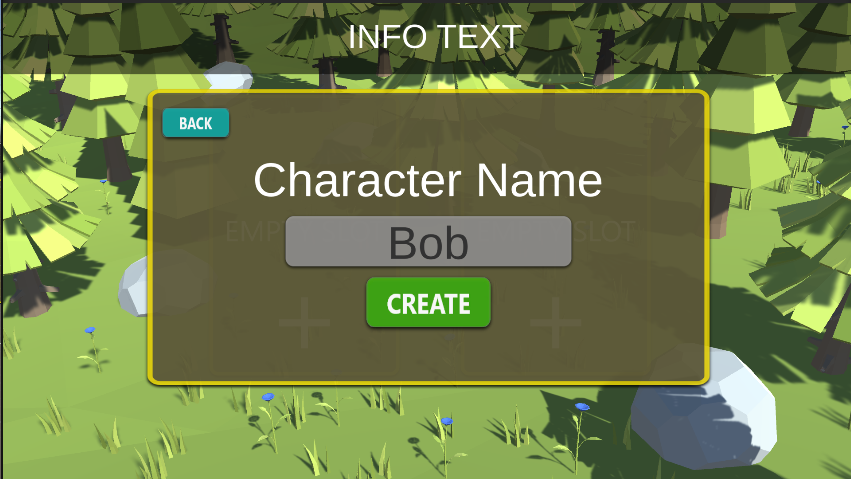
}We are going to call OpenCreateNewCharacterPrompt when we click an EmptyCharacterSlotButton. We also need a new UI panel so the player can enter the name of their character.
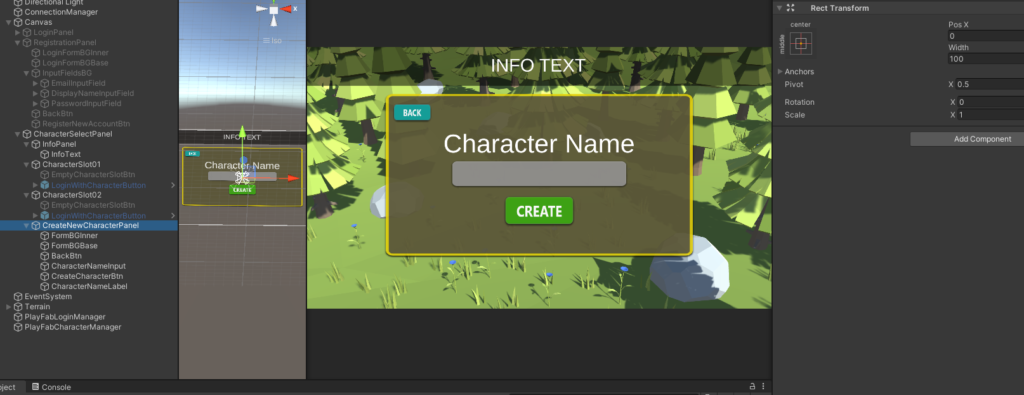
Add a new reference at the top “public GameObject NewCharacterCreatePanel;” – in the UI, create a new empty game object as a child of CharacterSelectPanel and add your art (or at the very least an input field and a button):
Wire up the empty character slots to open the prompt, and the back button to close it. At this point you should test to make sure everything is working as expected. Don’t forget to set all your references in the editor. If you forget something, you will see an error like:
UnassignedReferenceException: The variable NewCharacterCreatePanel of PlayFabCharacterManager has not been assigned.
You probably need to assign the NewCharacterCreatePanel variable of the PlayFabCharacterManager script in the inspector.
So that should point you in the right direction.
Once you confirm everything is working (Login -> Select -> Click Empty Slot -> Prompt for character name) we can *finally* write the code to make a new character.
First we need a new method inside PlayFabCharacterManager called TryCreateNewCharacter which will talk to our Server, passing it the desired name. The Server will call PlayFab and if all goes well create a character on the PlayFab backend. After we confirm this worked (via callback) will tell the player they have succeeded and reload the characters for that player.
Start by adding the new method:
public void OnTryCreateCharacter(TMP_InputField nameInput)
{
    string desiredCharacterName = nameInput.text;

    if (string.IsNullOrEmpty(desiredCharacterName))
    {
        InfoText.text = "Name cannot be empty";
    } else if (desiredCharacterName.Length < 3)
    {
        InfoText.text = "Name cannot be less then 3 character";
    }

    ConnectionManager.Instance.OnTryCreateNewCharacter(desiredCharacterName);
    CloseCreateNewCharacterPrompt();
}
Create the method needed in ConnectedManager and add a reference at the top for your InfoText field (if you have one, otherwise you can use Debug.Log).
In the inspector before we forget, assign your InfoText reference (if you have one). Next, we need to add a new tag and message to go with it, so in NetworkMessages add the tag:
RegisterNewCharacterRequestAnd the message:
public struct RegisterNewCharacterRequestData : IDarkRiftSerializable
{
    public string CharacterName;

    public RegisterNewCharacterRequestData(string name)
    {
        CharacterName = name;
    }
    public void Deserialize(DeserializeEvent e)
    {
        CharacterName = e.Reader.ReadString();
    }

    public void Serialize(SerializeEvent e)
    {
        e.Writer.Write(CharacterName);
    }
}
Copy your changes over to your Server messages so you don’t forget 🙂 Back in ConnectionManager on the Client fill out OnTryCreateNewCharacter:
public void OnTryCreateNewCharacter(string name)
{
    using (Message message = Message.Create((ushort)Tags.RegisterNewCharacterRequest, new    RegisterNewCharacterRequestData(name)))
    {
        Client.SendMessage(message, SendMode.Reliable);
    }
}
Swap over to the Server. Inside ConnectedClient’s OnMessage add a new case:
case Tags.RegisterNewCharacterRequest:
    OnPlayerRegisterNewCharacterRequest(m.Deserialize<RegisterNewCharacterRequestData>());
    break;
And create the method to go with it:
private void OnPlayerRegisterNewCharacterRequest(RegisterNewCharacterRequestData data)
{

}
We are going to create a new file to deal with PlayFab API requests called PlayFabAPICaller. In the editor create the game object and script with that name, and make it a Singleton.
Back inside OnPlayerRegisterNewCharacterRequest we are going to make a call to this file:
private void OnPlayerRegisterNewCharacterRequest(RegisterNewCharacterRequestData data)
{
    PlayFabAPICaller.Instance.TryCreateNewCharacter(data.CharacterName, PlayFabID, ClientID);
}
Our PlayFab calls shouldn’t need to worry about DarkRift stuff, so we will pass in the desired name as directly as a string. We also need to pass along the stored PlayFabID we have for this client so the PlayFab API knows who to call this for and the ClientID so we can update the player when we get a result.
Bear with me here, we have to write a bunch of code before we will see any real result but I promise we will 🙂
Inside PlayFabAPICaller.cs under your Awake method, add the following methods:
public void TryCreateNewCharacter(string name, string playfabID, ushort clientID)
{

    GrantCharacterToUserRequest request = new GrantCharacterToUserRequest
    {
        CharacterName = name,
        CharacterType = "Basic",
        PlayFabId = playfabID
    };

    PlayFabServerAPI.GrantCharacterToUser(request,
    result =>
    {
        Debug.Log($"Character for player with ID {playfabID} succesfully created");
        Debug.Log($"setting initial stats and returning result to player");

        UpdateCharacterStatisticsRequest updateCharacterRequest = new UpdateCharacterStatisticsRequest()
        {
            CharacterId = result.CharacterId,
            PlayFabId = playfabID,
            CharacterStatistics = new Dictionary<string, int>()
            {
                {"Level", 1 },
                {"XP", 0 },
                {"Gold", 0 }
            }
        };

        PlayFabServerAPI.UpdateCharacterStatistics(updateCharacterRequest,
        result =>
        {
            Debug.Log($"Initial stats set, telling client to update character list");
            ServerManager.Instance.SendToClient(clientID, Tags.RegisterNewCharacterResponse, new RegisterNewCharacterResponseData(true));
        },
        error =>
        {
            Debug.Log($"Error: {error.ErrorMessage}");
            ServerManager.Instance.SendToClient(clientID, Tags.RegisterNewCharacterResponse, new RegisterNewCharacterResponseData(false));

        });
    },
    error =>
    {
        Debug.Log($"Error: {error.ErrorMessage}");
        ServerManager.Instance.SendToClient(clientID, Tags.RegisterNewCharacterResponse, new RegisterNewCharacterResponseData(false));

    });
}
This might look like a lot but it really isn’t (especially if you remove the logging). First, we call TryCreateNewCharacter passing in the name, type, and PlayFabID for that player. The type is not really something that is well documented but it could be something like “Warrior” or “Mage” or “BlueWarrior” (from their own example). Once we confirm we have created a new character, we make another call to update some initial stats. If that also goes well, we will let the player know and update the character select screen on the client. Once we have a character we can select it and join the game, setting a display name for that player. Don’t forget to make a tag and message for RegisterCharacterResponseData:
public struct RegisterNewCharacterResponseData : IDarkRiftSerializable
{
    public bool RegisteredSuccessfully;

    public RegisterNewCharacterResponseData(bool registeredSuccessfully)
    {
        RegisteredSuccessfully = registeredSuccessfully;
    }
    public void Deserialize(DeserializeEvent e)
    {
        RegisteredSuccessfully = e.Reader.ReadBoolean();
    }

    public void Serialize(SerializeEvent e)
    {
        e.Writer.Write(RegisteredSuccessfully);
    }
}
ASIDE: I am not a huge fan of nesting callbacks as that can lead to “Callback Hell” but I think in this case it is fine since there is only one nested layer. Creating separate callback methods for each success/failure on each API call we want to make is going to add a lot of code. If your responses to results are a bit more involved then 1-2 lines you might want to do this though. If you wanted to do that approach you could refactor the callbacks to be seperated from the initial method:
public void TryCreateNewCharacter(string name, string playfabID, ushort clientID)
{

    GrantCharacterToUserRequest request = new GrantCharacterToUserRequest
    {
        CharacterName = name,
        CharacterType = "Basic",
        PlayFabId = playfabID
    };

    PlayFabServerAPI.GrantCharacterToUser(request, result => GrantCharacterToUserSuccess(result, playfabID, clientID), error => GrantCharacterToUserFailed(error, clientID));

}

private void GrantCharacterToUserSuccess(GrantCharacterToUserResult result, string playfabID, ushort clientID)
{

    UpdateCharacterStatisticsRequest updateCharacterRequest = new UpdateCharacterStatisticsRequest()
    {
        CharacterId = result.CharacterId,
        PlayFabId = playfabID,
        CharacterStatistics = new Dictionary<string, int>()
                    {
                        {"Level", 1 },
                        {"XP", 0 },
                        {"Gold", 0 }
                    }
    };

    PlayFabServerAPI.UpdateCharacterStatistics(updateCharacterRequest, result => UpdateCharacterStatisticsSuccess(result, clientID), error => UpdateCharacterStatisticsFailed(error, clientID));
}
Etc. It’s really up to you, either way works.
We could always send back more helpful data to display on the client, like what the error is if we get one, but I think that is something you should be able to add on your own if you wish. Right now, we want to wait for a response on the client and display either a success or failure message.
I don’t really think this code belongs inside ConnectionManager, so lets update PlayFabCharacterManager to be able to handle the response from the server. ConnectionManager is primarily concerned with connecting, joining, spawning, despawning, and disconnecting. Add the three using statements at the top for DarkRift:
using DarkRift;
using DarkRift.Client;
using DarkRift.Client.Unity;
After Awake, add the following:
private void Start()
{
    ConnectionManager.Instance.Client.MessageReceived += OnMessage;
}


private void OnMessage(object sender, MessageReceivedEventArgs e)
{
    using (Message m = e.GetMessage())
    {
        switch ((Tags)m.Tag)
        {
            case Tags.RegisterNewCharacterResponse:
                OnRegisterNewCharacterResponse(m.Deserialize<RegisterNewCharacterResponseData>());
                break;

        }
    }
}

private void OnRegisterNewCharacterResponse(RegisterNewCharacterResponseData data)
{
    if (!data.RegisteredSuccessfully)
    {
        InfoText.text = "Error Creating New Character.";
        return;
    }

    InfoText.text = "New Character Created Successful! Retrieving Character.";
    OnTryRetrieveCharacters();
}
First, we subscribe to messages for the client. Then we add our OnMessage block to handle messages aimed at character creation. Finally, we check to see if the character was registered successfully. If not, we inform the player and return. If it did succeed, we inform the player and refresh the character list in the UI. At the end of the file make sure you add:
private void OnDestroy()
{
ConnectionManager.Instance.Client.MessageReceived -= OnMessage;
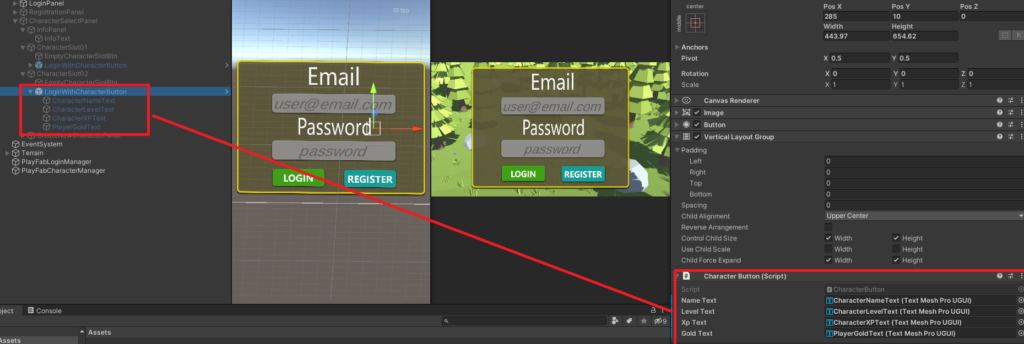
}We just need to do a few more things before we can see this working as it should. First, in the UI we want to add a script to our LoginWithCharacterButton prefab so we can set the various text fields with the character data values. This is what mine looks like:
using System.Collections;
using System.Collections.Generic;
using UnityEngine;
using UnityEngine.UI;
using TMPro;

namespace DarkRiftRPG
{
    public class CharacterButton : MonoBehaviour
    {
        public TMP_Text nameText;
        public TMP_Text levelText;
        public TMP_Text xpText;
        public TMP_Text goldText;

        public bool statsSet;

        public void Init(string name, string level, string xp, string gold)
        {
            nameText.text = "Name\n" + name;
            levelText.text = "Level\n" + level;
            xpText.text = "XP\n" + xp;
            goldText.text = "Gold\n" + gold;

            statsSet = true;
        }
    }
}
Pretty straight forward stuff. When we get characters back from PlayFab we will grab a reference to this script so we can populate the character button with our server values. I plan to do a refactor of the entire codebase after we get character selection completed, but for now update ShowCharacterSlotButtons to call a new method passing in our results:
private void ShowCharacterSlotButtons(List<CharacterResult> results)
{
    PlayerCharacterSlot1.transform.GetChild(0).gameObject.SetActive(false);
    PlayerCharacterSlot1.transform.GetChild(1).gameObject.SetActive(false);
    PlayerCharacterSlot2.transform.GetChild(0).gameObject.SetActive(false);
    PlayerCharacterSlot2.transform.GetChild(1).gameObject.SetActive(false);

    switch (Characters.Count)
    {
        case 0:
            //No characters
            PlayerCharacterSlot1.transform.GetChild(0).gameObject.SetActive(true);
            PlayerCharacterSlot2.transform.GetChild(0).gameObject.SetActive(true);
            break;
        case 1:
            //One character
            PlayerCharacterSlot1.transform.GetChild(1).gameObject.SetActive(true);
            PlayerCharacterSlot2.transform.GetChild(0).gameObject.SetActive(true);
            break;
        case 2:
            //Two characters
            PlayerCharacterSlot1.transform.GetChild(1).gameObject.SetActive(true);
            PlayerCharacterSlot2.transform.GetChild(1).gameObject.SetActive(true);
            break;
        default:
            break;
    }

    SetCharacterButtonInfo(results);
}
And create that method as follows:
private void SetCharacterButtonInfo(List<CharacterResult> characterResults)
{
    CharacterButton[] CharacterButtons = FindObjectsOfType<CharacterButton>();

    foreach (CharacterResult characterResult in characterResults)
    {
        GetCharacterStatisticsRequest characterStatsReq = new GetCharacterStatisticsRequest
        {
            CharacterId = characterResult.CharacterId
        };

        PlayFabClientAPI.GetCharacterStatistics(characterStatsReq,
        result =>

        {
            for (int i = 0; i < CharacterButtons.Length; i++)
            {
                if (!CharacterButtons[i].statsSet)
                {
                    string level = result.CharacterStatistics["Level"].ToString();
                    string xp = result.CharacterStatistics["XP"].ToString();
                    string gold = result.CharacterStatistics["Gold"].ToString();

                    CharacterButtons[i].Init(characterResults[i].CharacterName, level, xp, gold);

                    return;
                }
            }
        },
        error =>
        {
            InfoText.text = "Error getting character stats";
            Debug.Log(error.ErrorMessage);
        });
    }
}
Thats a lot to take in so lets break it down. First, we create an array of all (in this case 2) character buttons from the UI (or rather, the scripts that control them). Then, we loop through our results and for each one make a request to get the stats we set on the server when we created the character. If we get a result, we loop through our buttons to see if stats for the button have already been set.
When you call OnTryCreateCharacter make sure to add CloseCreateNewCharacterPrompt(); at the end or the UI won’t go away in the way you expect.
Ok. Moment of truth. We just wrote a LOT of code without testing…
Here is what I saw when I tested it after I debugged a few things and plugged in some missing references (Can you believe it wasn’t perfect first try!?):
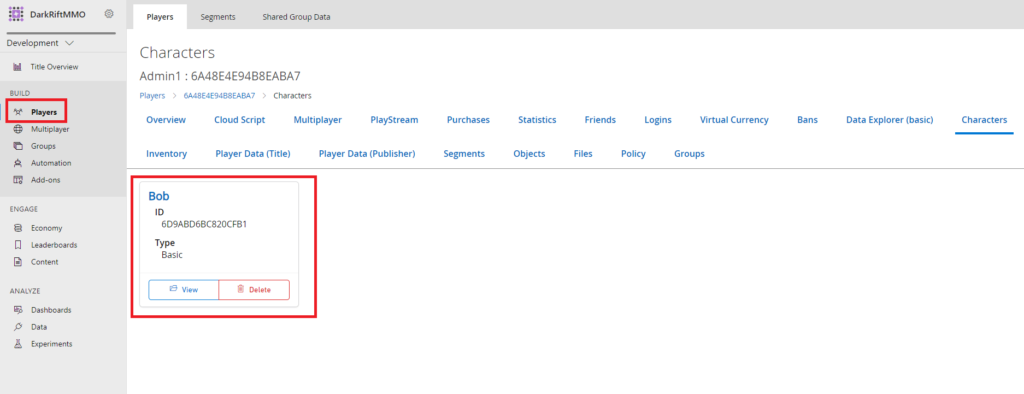
And if you look in your PlayFab backend after doing this (search for your player) you should end up here after a few clicks:
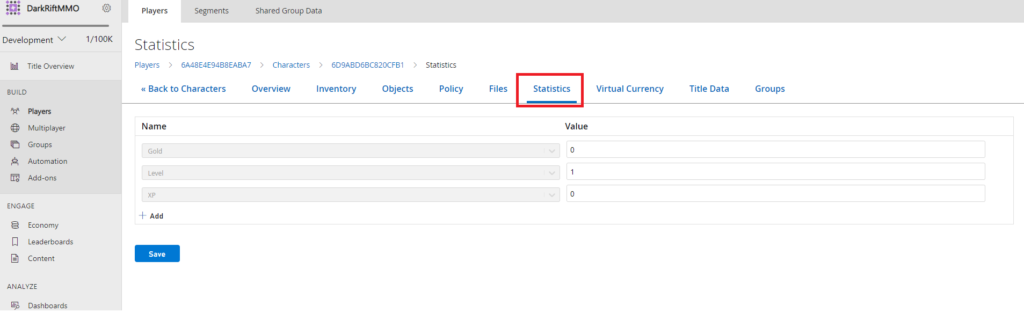
Awesome. That was a lot to slog through so thanks for sticking with me. I find that the process of making something like this has you touching many files and not always in the order you think you will. There are a couple features missing from our login system – the ability to logout and bring you back to the login screen, the ability to delete characters, etc – those are all things we can add later. Please keep in mind that you don’t need to follow my code 100% – your project might have difference requirements or you may want to do something a different way. As long as it *works* that is all you need right now. This post got a little messy so if you spot an issue please let me know in the comments and I will try to fix it.
The last thing we need to do is have the player spawn-in when it is selected and show the player name above the character in game.
We will also want to be able to load/save the last position of that character so we can start adding some persistence to our game. I am going to handle that in the next post, and then post the refactored code. It should be a fairly quick one. See you there!