
In the last post, we wrote the code needed to create new characters and return them to the player. In this post, we will take the last step in this part of the series and use the character buttons to join the game world. We are going to use a static class to hold our PlayFab stat values (name, level, xp, gold) and for display the name to other players. After this post, I am going to be going through and refactoring some things that got created in non-ideal ways.
The first thing we will do is add an event listener to any button that has character data. Inside PlayFabCharacterManager.cs under
CharacterButtons[i].Init(characterResults[i].CharacterName, level, xp, gold);add
CharacterButtons[i].gameObject.GetComponent<Button>().onClick.AddListener(() => { TryJoinGameAsCharacter(characterResults[i].CharacterName, level, xp, gold); });We need to use the () => syntax (or you could write it out as a delegate) to be able to pass in our variables from the server to this click event.
Next we need to create TryJoinGameAsCharacter and fill it out, but before we do, lets have a quick discussion about passing data between scenes. So far, data persists in the ConnectionManager between scenes, but the code to join the game needs to pass some info and while we will actually join the game itself inside ConnectionManager, it is not a very good place to have character data.
This post on stackexchange has a great list of methods to achieve this and the pros/cons of each. I am going to go with a static class but you can do this however you wish. I am using a static class because it avoids the need to create a singleton and all it is going to be doing is holding data and firing an “OnDataChanged” event so we can update various UI and gameplay elements.
Create a new class called “PlayFabCharacterData” and fill it out like so:
using System;

namespace DarkRiftRPG
{
    public static class PlayFabCharacterData
    {
        static event Action OnCharacterInfoUpdated;

        public static string CharacterName { get; private set; }
        public static string CharacterLevel { get; private set; }
        public static string CharacterXP { get; private set; }
        public static string CharacterGold { get; private set; }


        public static string PlayFabPlayerID { get; private set; }

        public static void UpdatePlayerData(string name, string level, string xp, string gold)
        {
            CharacterName = name ?? CharacterName ?? "";
            CharacterLevel = level ?? CharacterLevel ?? "";
            CharacterXP = xp ?? CharacterXP ?? "";
            CharacterGold = gold ?? CharacterGold ?? "";

            OnCharacterInfoUpdated?.Invoke();
        }

        public static void SetPlayFabPlayerID (string playerID) => PlayFabPlayerID = playerID;
    }
}
This is pretty straight forward. We have properties with public getters and we have a static method to update the values. If you have never seen the syntax:
CharacterName = name ?? CharacterName ?? "";the “??” is the null-coalescing operator – basically this says “Assign my name from the name passed in, if nothing was passed in, keep it as the existing CharacterName. If nothing was passed in AND CharacterName has not been set, fall back to an empty string”
This was instead of having a setter for each (which you certainly could do) if you call UpdatePlayerData like:
UpdatePlayerData(null, 5, null, null)It will keep existing values for the name, level, and gold. The important “got ya” is that you have to remember the order the values go.
static event Action OnCharacterInfoUpdated;
...
OnCharacterInfoUpdated?.Invoke();
These two lines create a new event that gets called any time UpdatePlayerData is called. We can listen for this in other files and update the UI/Player Inventory, etc. Later on, we can add a player inventory array/list to this file along with anything else we want to pass from client PlayFab calls.
Back inside PlayFabCharacterManager fill our TryJoinGameAsCharacter:
private void TryJoinGameAsCharacter(string name, string level, string xp, string gold)
{
    PlayFabCharacterData.UpdatePlayerData(name, level, xp, gold);
    ConnectionManager.Instance.OnPlayerTryJoinGameWithCharacter();
}
Now, we just need to call the code we had back in part four of this series, passing in the CharacterID. On the server we will make a call to get and store the data for that character inside the ConnectedClient class and use that to set values on both the server and client side. We already have an existing SpawnLocalPlayerRequest inside ConnectionManager – lets update this and create a message so we can send a bit more information to the server.
First, lets update the name and tag to be a bit cleaner. Change SpawnLocalPlayerRequest() to be TryJoinGameAsCharacterRequest() and Tags.SpawnLocalPlayerRequest to be Tags.JoinGameAsCharacterRequest. You will also want to update the tag for the response as well (SpawnLocalPlayerResponse -> JoinGameAsCharacterResponse). Next create a new struct:
public struct JoinGameAsCharacterRequestData : IDarkRiftSerializable
{
    public string CharacterID;

    public JoinGameAsCharacterRequestData(string characterID)
    {
        CharacterID = characterID;
    }
    public void Deserialize(DeserializeEvent e)
    {
        CharacterID = e.Reader.ReadString();
    }

    public void Serialize(SerializeEvent e)
    {
        e.Writer.Write(CharacterID);
    }
}
We already have the player PlayFabID stored on the server and we know which player this is on the server so all we need to pass is the CharacterID
Update TryJoinGameAsCharacterRequest:
public void TryJoinGameAsCharacterRequest(string characterID)
{
    using (Message message = Message.Create((ushort)Tags.JoinGameAsCharacterRequest, new JoinGameAsCharacterRequestData(characterID)))
    {
        Client.SendMessage(message, SendMode.Reliable);
    }
}
And inside your character manager update TryJoinGameAsCharacter:
private void TryJoinGameAsCharacter(string characterID, string name, string level, string xp, string gold)
{
    PlayFabCharacterData.UpdatePlayerData(characterID, name, level, xp, gold);
    SceneManager.LoadScene("Game");
}
and make sure to include using UnityEngine.SceneManagment at the top. Copy over your NetworkManager changes and switch over to the Server. Inside ConnectedClient.cs update your first OnMessage case to be:
case Tags.JoinGameAsCharacterRequest:
    OnJoinGameAsCharacterRequest(m.Deserialize<JoinGameAsCharacterRequestData>());
    break;
Update your method:
private void OnJoinGameAsCharacterRequest(JoinGameAsCharacterRequestData data)
{

     PlayFabAPICaller.Instance.TryRetrieveCharacterData(ClientID, data.CharacterID);
    //PlayerManager.Instance.SpawnPlayerOnServer(ClientID);
}
We want to do some stuff before we spawn the player server side and in turn on the client so we are commenting out our call to SpawnPlayerOnServer (we are going to move this code shortly).
Inside PlayFabAPICaller we will first get the players characters, and then loop through until we find the one with the matching ID. Then we will get the stats for that character using another API call. We will make a struct to hold both the name and stats of the character, and use this to set our ServerPlayerCharacterData (which we will make). We will cache the character info and tell the server to spawn the player character, also spawning it on the client and setting the name.
At the top of PlayFabAPICaller above the class declaration add a new struct:
public struct PlayFabCharacterData
{
    public string PlayFabID;
    public string CharacterID;
    public string Name;
    public string Level;
    public string XP;
    public string Gold;


    public PlayFabCharacterData (string playfabID, string characterID, string name, string level, string xp, string gold)
    {
        PlayFabID = playfabID;
        CharacterID = characterID;
        CharacterName = name;
        CharacterLevel = level;
        CharacterXP = xp;
        CharacterGold = gold;
    }
}
We will fill this out from the result we get inside TryRetrieveCharacterData:
public void TryRetrieveCharacterData(ushort clientID, string playfabID, string characterID)
{
    ListUsersCharactersRequest listUsersCharactersRequest = new ListUsersCharactersRequest
    {
        PlayFabId = playfabID
    };

    PlayFabServerAPI.GetAllUsersCharacters(listUsersCharactersRequest,
    result =>
    {
        foreach (CharacterResult character in result.Characters)
        {
            if (character.CharacterId == characterID)
            {
                GetCharacterStatisticsRequest getCharacterStatisticsRequest = new GetCharacterStatisticsRequest
                {
                    CharacterId = characterID,
                    PlayFabId = playfabID
                };

                PlayFabServerAPI.GetCharacterStatistics(getCharacterStatisticsRequest,
                result =>
                {
                    PlayFabCharacterData characterData = new PlayFabCharacterData(
                        playfabID,
                        character.CharacterId,
                        character.CharacterName,
                        result.CharacterStatistics["Level"].ToString(),
                        result.CharacterStatistics["XP"].ToString(),
                        result.CharacterStatistics["Gold"].ToString());

                    PlayerManager.Instance.SpawnPlayerOnServer(clientID, characterData);
                },
                error =>
                {
                    Debug.Log("Error retrieving character stats");
                });
            }
        }
    },
    error =>
    {
        Debug.Log("Error retrieving character");
    });
}
It looks like a lot but again is pretty direct:
- Make a request to get all the players characters (there is no way to grab an individual character as far as I know and PlayFab says this is just as efficient) .
- Loop through the characters until we find one with the matching CharacterID.
- Use that ID to make another call to get the stats for that character.
- Use that information combined with information from above to fill out a characterData struct and pass it to SpawnPlayerOnServer inside PlayerManager
Update SpawnPlayerOnServer:
public void SpawnPlayerOnServer(ushort clientID, PlayFabCharacterData characterData)
{
    if (!CurrentPlayers.ContainsKey(clientID))
    {
        GameObject go = Instantiate(ServerPlayerPrefab, ServerPlayerPrefab.transform.position, Quaternion.identity);
        CurrentPlayers.Add(clientID, go);

        PlayerSpawnData data = new PlayerSpawnData(clientID, go.transform.position, characterData.CharacterName);
        ServerManager.Instance.ConnectedClients[clientID].CurrentCharacterData = characterData;
        ServerManager.Instance.ConnectedClients[clientID].SpawnLocalPlayerOnClient(data);


        ServerPlayerController controller = CurrentPlayers[clientID].GetComponent<ServerPlayerController>();
        ServerManager.Instance.SendNewPlayerToOthers(clientID, controller.transform.position, characterData.CharacterName);
        ServerManager.Instance.SendOthersToNewPlayer(clientID, CurrentPlayers);
    }
}
And update our PlayerSpawnData struct:
public struct PlayerSpawnData : IDarkRiftSerializable
{
    public ushort ID;
    public Vector3 Position;
    public string PlayerCharacterName;

    public PlayerSpawnData(ushort id, Vector3 position, string name)
    {
        ID = id;
        Position = position;
        PlayerCharacterName = name;
    }

    public void Deserialize(DeserializeEvent e)
    {
        ID = e.Reader.ReadUInt16();
        Position = e.Reader.ReadVector3();
        PlayerCharacterName = e.Reader.ReadString();
    }

    public void Serialize(SerializeEvent e)
    {
        e.Writer.Write(ID);
        e.Writer.WriteVector3(Position);
        e.Writer.Write(PlayerCharacterName);
    }
}
Copy your changes over to the matching file. We can remove our commented out “PlayerManager.Instance.SpawnPlayerOnServer(ClientID);” inside ConnectedClients now. You will also need to update SendNewPlayerToOthers and SendOthersToNewPlayer:
public void SendNewPlayerToOthers(ushort clientID, Vector3 position, string name)
{
    PlayerSpawnData spawnData = new PlayerSpawnData(clientID, position, name);
    SendToAllExcept(clientID, Tags.SpawnPlayer, spawnData);
}

public void SendOthersToNewPlayer(ushort clientID, Dictionary<ushort, GameObject> players)
{
    foreach (KeyValuePair<ushort, GameObject> player in players)
    {
        if (player.Key != clientID)
        {
            PlayerSpawnData spawnData = new PlayerSpawnData(player.Key, player.Value.transform.position, ConnectedClients[player.Key].CurrentCharacterData.CharacterName);
            SendToClient(clientID, Tags.SpawnPlayer, spawnData);
        }
    }
}
Awesome, back on the client update Start inside GameManager to call ConnectionManager.Instance.TryJoinGameAsCharacterRequest(PlayFabCharacterData.CharacterID);
Don’t forget to uncomment out our Destroy(PlayerManager.Instance.CurrentPlayers[e.Client.ID]); call in OnClientDisnonnected inside ServerManager.
Everything should work now, the only thing left to do is to display character names and change the camera so we have a better view. So lets do that.
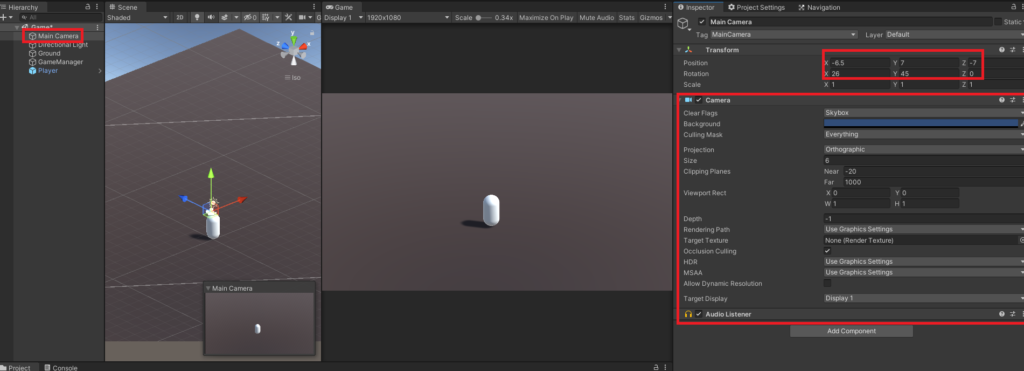
On the Client open your Game scene. Change the Main Camera to Orthographic and give it the following settings (or don’t, and set it up however feels right to you :)):
Inside SpawnPlayer after we Instantiate the playerPrefab add:
if (data.ID == LocalPlayerID)
{
   Camera.main.gameObject.GetComponent<SimpleCameraController>().Init(go);
}
Create your camera script (you can name it whatever, I went with SimpleCameraController):
using System.Collections;
using System.Collections.Generic;
using UnityEngine;

public class SimpleCameraController : MonoBehaviour
{
    public GameObject player;

    private Vector3 offset;

    // Use this for initialization
    public void Init(GameObject go)
    {
        player = go;
        offset = transform.position - player.transform.position;
    }

    void LateUpdate()
    {
        if (!player)
            return;

        transform.position = player.transform.position + offset;
    }
}
And attach it to your Camera. Now when you load in, the camera should be following the player at a much better location. Build a few clients, it should all work as expected.
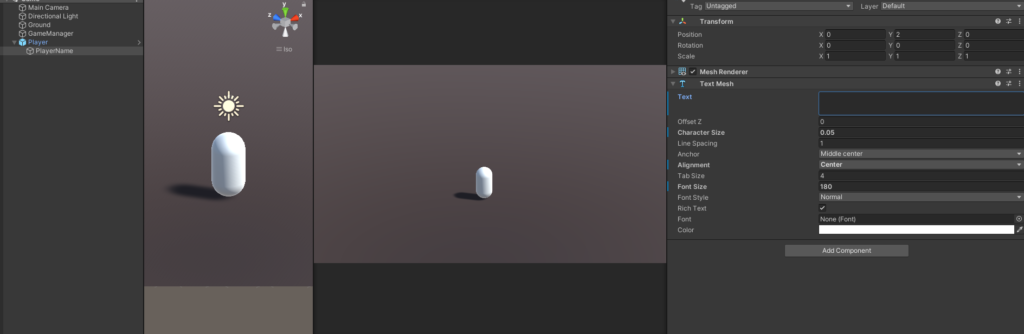
Ok, finally, the actual last thing, I PROMISE – player names. On the Client open your player prefab and add a child game object. To that, add a TextMesh component:
If you did this in the scene make sure to apply your changes to the prefab. Inside GameManager.cs where you spawn the player, add:
go.GetComponentInChildren<TextMesh>().text = data.PlayerCharacterName;Lastly, attach a script to the game object with the textmesh on it:
using System.Collections;
using System.Collections.Generic;
using UnityEngine;

namespace DarkRiftRPG
{
    public class PlayerName : MonoBehaviour
    {
        Camera m_Camera;
        private void Start()
        {
            m_Camera = Camera.main;
        }
        void Update()
        {
            transform.LookAt(transform.position + m_Camera.transform.rotation * Vector3.forward,
                m_Camera.transform.rotation * Vector3.up);
        }
    }
}
Save everything and build. You should now be able to login with multiple accounts and see other players in game with the correct names!
As I have stated a few times, I am going to do a refactor of the entire code base, and going into post 10 we will be using that.